环境准备
1. 安装node.js
下载地址:https://nodejs.org/en/
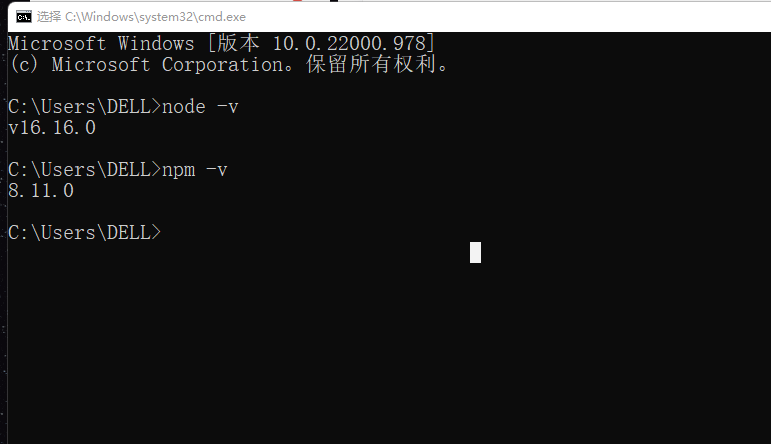
2. 检查安装
搭建vue环境
1. 全局安装脚手架vue-cli
在命令行输入:
vue-cli2(第一行)
vue-cli3(第二行)
1
2
| npm install vue-cli -g
npm install -g @vue/cli
|
2. 检查是否安装成功:输出版本号说明安装成功
创建vue项目的三种方法
1. webpack创建项目
以管理员打开命令行界面
全局安装webpack(vue2需要安装这个)
创建项目(blog)
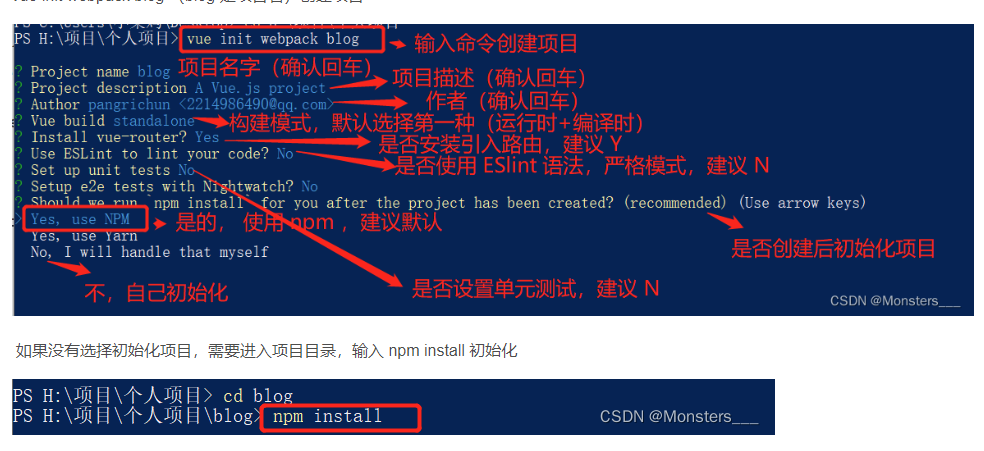
输入 npm run dev 运行项目
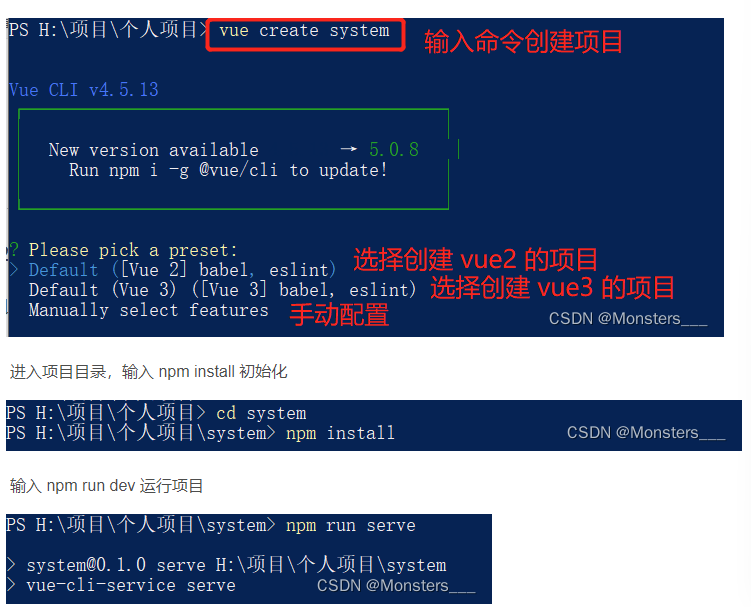
2. vue-cli3创建项目
在需要创建项目的路径下进入cmd
输入命令 vue create 项目名称
3. 基于图形化界面的方式创建vue
- 主要依赖于vue-cli3,在全局安装完成cli3.0之后,在cmd输入vue ui启动
使用webpack与vue-cli3创建项目的区别
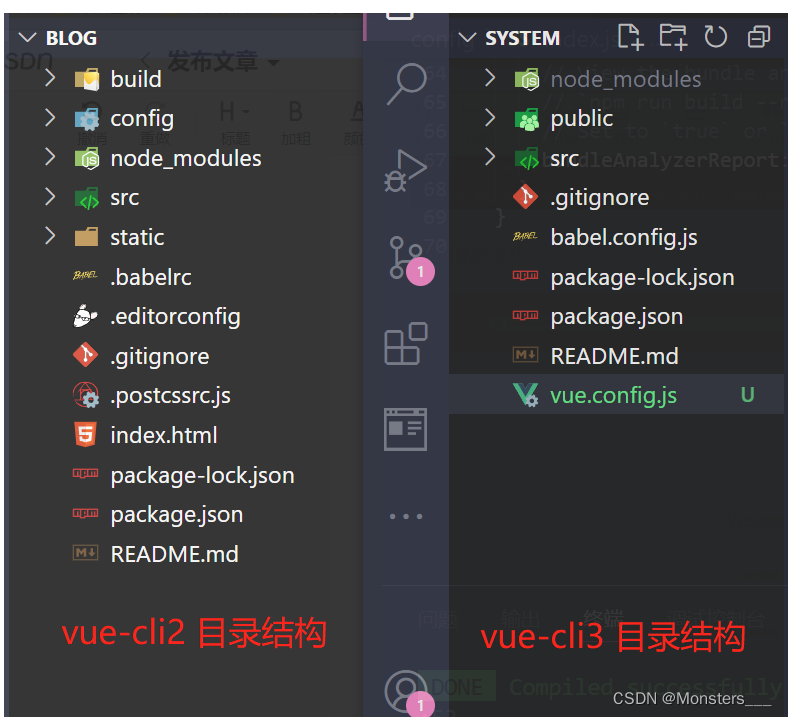
- vue-cli3移除了配置文件目录:config和build文件夹,增加里vue.config.js文件,移除了static静态文件夹,新增public文件夹并将index.html移动到public中
- vue-cli2在config中的dev.env.js和prod.env.js中分别配置了域名,vue-cli3在vue.config中配置域名
- ==vue-cli2在config中的index.js中配置跨域,vue-cli3在vue.config.js中配置跨域。==
- vue-cli3内部封装了webpack且做了很多适合vue项目的优化,可以用vue.config.js来管理项目,vue-cli2更加适合含有特殊需求的,毕竟是原生的,但管理起来复杂,一般来说,vue-cli3够用了,但是vue-cli3能实现的,vue-cli2一定能实现,vue-cli2可以实现的,vue-cli3不一定能实现。
搭建vue项目开发环境
配置跨域
在对应的文件中配置信息
1
2
3
4
5
6
7
8
9
10
11
12
13
14
15
16
17
18
| module.exports = {
devServer: {
port: 9000,
host:'localhost',
open: true,
proxy: {
'/api': {
target: 'http://localhost:6020/imooc',
secure: false,
changeOrigin: true,
pathRewrite: {
'^/api': '/'
}
}
}
}
}
|
vuex
Vuex是一个专为VUe.js应用程序开发的状态管理模式+库,比如说全局变量的存取
1. 安装
1
| npm install vuex@next --save
|
2. 在store文件夹创建index.js
1
2
3
4
5
6
7
8
9
10
11
12
13
14
15
16
17
18
19
20
21
22
23
24
25
26
27
28
29
30
31
32
33
| import { createStore } from 'vuex'
export default createStore({
state: {
sysUser:{},
dept:{},
showOverlay:false
},
getters: {
},
mutations: {
setSysUser(state,newValue){
state.sysUser=newValue
},
setDept(state,newValue){
this.state.dept=newValue
},
setShowOverlay(state,newValue){
this.state.showOverlay=newValue
}
},
actions: {
},
modules: {
}
})
|
3. 在页面如何使用
1
2
3
4
5
6
7
8
9
| import { useStore } from "vuex"
export default{
setup() {
const store = useStore();
cosole.log(store.state.showOverlay)//获取全局变量
let that=this
that.$store.commit("setShowOverlay",true)//设置全局变量
}
}
|
4. 注意
上述方式(mutation)限制的是必须同步执行,可以通过Action方式去调用异步API和分发多重mutation(相当于在一个action中对多个mutation进行操作),所以这个需要后续补充。
vue-router
主要是实现vue项目的页面跳转,以及定义页面跳转之前的或者之后的公用方法,可以实现相当于一个拦截器类似的功能。
1. 安装(vue-router4)
1
| npm install vue-router@4
|
2. 书写index.js
1
2
3
4
5
6
7
8
9
10
11
12
13
14
15
16
17
18
19
20
21
22
23
24
25
26
27
28
29
30
31
32
33
34
35
36
37
38
39
40
41
42
43
44
45
46
47
48
49
50
51
52
53
54
| import { createRouter, createWebHistory } from 'vue-router'
import LoginView from '../views/LoginView.vue'
const routes = [
{
path: '/',
name: 'login',
component: LoginView
},
{
path: '/dashboard',
name: 'dashboard',
component: () => import( '../views/DashboardView.vue')
},
{
path:'/user',
name: 'user',
component: ()=>import('../views/UserView')
},
{
path: '/register',
name: 'register',
component: ()=>import('../views/RegisterView')
}
]
const router = createRouter({
history: createWebHistory(process.env.BASE_URL),
routes
})
router.beforeEach((to, from, next) => {
if (to.path === '/') {
next();
} else {
let token = localStorage.getItem('token');
if (token == null || token === '') {
console.log('请先登录')
next({
path: '/',
query: {
redirect: to.fullPath
}
})
} else {
next();
}
}});
export default router
|
3. 主体页面如何引用组件页面
4. 在vue3中如何定义数据和方法
==主要是在setup()方法中设置,该方法中的生命周期在created()之前,所以在这个方法中this是未定义的==
1
2
3
4
5
6
7
8
9
10
11
12
13
14
15
16
17
18
19
20
21
22
23
24
25
26
27
28
29
30
31
32
33
34
35
36
| <template>
</template>
<script>
import { ref } from 'vue';
export default{
setup(){
const isActive=ref(false)//布尔类型
const typeSelect=ref(0)//int类型
const timeTitle =ref('')//字符串类型
const currentDate=ref(new Date())
const item=ref(null)//对象
const option=[
{text:'历史数据',value:0},
{text;'排行数据',value:1}
];
//以下几种定义方法
const onConfirmEndTime = (value) =>{
//业务处理 比如设置值
timeTitle.value='第一个';
}
function getAllData(param){
}
}
return{
isActive,
typeSelect,
timeTitle,
currentDate,
item,
option,
onConfirmEndTime,
getAllData
};
}
</script>
|
5. 页面传参(typeSelect、timeTile、startTimeResult、endTimeResult)
应该还有其他方式的传参,这里只写现在用的,其他的也不知道
1
2
3
4
5
6
7
8
9
10
11
| <template>
<HistoryPurchaseView :typeSelect="typeSelect" :timeSelect="timeTitle" :timeStart="startTimeResult" :timeEnd="endTimeResult"></HistoryPurchaseView>
</template>
<script>
import { HistoryPurchaseView } from '../components'
export default{
components:{
HistoryPurchaseView
}
}
</script>
|
跳转的页面
1
2
3
4
5
6
7
8
9
10
11
12
13
14
15
16
| <template>
</template>
<script>
export default{
name:'HistoryPurchaseView',
props:{
typeSelect:String,//定义传值的类型
timeSelect:String,
},
watch:{
'timeSelect'(newVal,oldVal){
//监听timeSelect的变化执行对应的方法
}
}
}
</script>
|
axios
axios是一个强大的发送http请求的库,通过我们的二次封装可以大大提高我们的开发效率。
http.js
1
2
3
4
5
6
7
8
9
10
11
12
13
14
15
16
17
18
19
20
21
22
23
24
25
26
27
28
29
30
31
32
33
34
35
36
37
38
39
40
41
42
43
44
45
46
47
48
49
50
51
52
53
54
55
56
57
58
59
60
61
62
63
64
65
66
67
68
69
70
71
72
73
| import axios from 'axios'
import store from './src/store/index'
axios.defaults.timeout = 5000;
axios.defaults.baseURL = '';
axios.interceptors.request.use((config) => {
if (config.push === '/') {
} else {
if (localStorage.getItem('token')) {
config.headers.Authorization = localStorage.getItem('token');
}
}
return config;
},(error) =>{
console.log('错误的传参')
return Promise.reject(error);
});
axios.interceptors.response.use((res) =>{
if(!res.data.success){
localStorage.removeItem('token');
return Promise.resolve(res);
}
store.state.showOverlay=false
return res;
}, (error) => {
console.log('网络异常')
return Promise.reject(error);
});
export function fetchPost(url, params) {
return new Promise((resolve, reject) => {
axios.post(url, params)
.then(response => {
resolve(response);
}, err => {
reject(err);
})
.catch((error) => {
reject(error)
})
})
}
export function fetchGet(url, param) {
return new Promise((resolve, reject) => {
axios.get(url, {params: param})
.then(response => {
resolve(response)
}, err => {
reject(err)
})
.catch((error) => {
reject(error)
})
})
}
export default {
fetchPost,
fetchGet,
}
|
具体使用
1
2
3
4
5
6
7
8
9
10
11
12
13
14
15
| import https from '../../http.js'
const onSubmit = (values) => {
https.fetchPost('api/security/token/login',values).then(function (res) {
if(res.data.success){
//设置登录成功返回的token
let token = res.data.data.access_token;
window.localStorage.setItem("token", token);
router.push('/dashboard')
}else{
Toast(res.data.message)
}
}).catch(function(err){
Toast("登录请求失败!!!");
})
};
|
qs
qs 是一个增加了一些安全性的查询字符串解析和序列化字符串的库。
安装
应用
qs.parse()是将URL解析成对象的形式
qs.stringify()是将对象序列化成URL的形式,以&进行拼接
项目上一些问题解决
组件上动态的让class是否生效
1
2
3
4
5
6
7
8
9
10
11
| <div :class={myClass:isActive}>
</div>
<script>
//这里动态的修改isActive的值,为true这myClass生效,为false则不生效
</script>
<style>
.myClass{
height:100xp;
}
</style>
|
页面刷新导致本页面的数据为初始值,导致查询方法数据失败
在app.vue中添加一下代码,还有通过全局变量控制遮罩是否在加载前显示
1
2
3
4
5
6
7
8
9
10
11
12
13
14
15
16
17
18
19
20
| <template>
<van-overlay :show="$store.state.showOverlay">
<div class="wrapper" @click.stop>
<van-loading size="40px" type="spinner" vertical >加载中...</van-loading>
</div>
</van-overlay>
<router-view/>
</template>
<script>
export default {
created() {
//在页面刷新时将vuex里的信息保存到localStorage里
window.addEventListener("beforeunload",()=>{
console.log("页面刷新了........")
localStorage.setItem("sysUser",$store.state.sysUser);
localStorage.setItem("sysDept",$store.state.dept);
})
}
}
</script>
|