Mybatis-Plus

Mybatis-Plus

了解

介绍

MyBatis-Plus(简称 MP)是一个 MyBatis 的增强工具,在 MyBatis 的基础上只做增强不做改变,为简化开发、提高效率而生。

官网:https://mybatis.plus/https://mp.baomidou.com/

我们的愿景是成为 MyBatis 最好的搭档,就像 魂斗罗 中的 1P、2P,基友搭配,效率翻倍

代码以及文档

文档地址:https://mybatis.plus/guide/

源码地址:https://github.com/baomidou/mybatis-plus

特性

  • 无侵入

    只做增强不做改变,引入它不会对现有工程产生影响,如丝般顺滑

  • 损耗小

    启动即会自动注入基本 CURD,性能基本无损耗,直接面向对象操作

  • 强大的CRUD 操作

    内置通用 Mapper、通用 Service,仅仅通过少量配置即可实现单表大部分 CRUD 操作,更有强大的条件构造器,满足各类使用需求

  • 支持Lambda形式调用

    通过 Lambda 表达式,方便的编写各类查询条件,无需再担心字段写错

  • 支持多种数据库

    支持 MySQL、MariaDB、Oracle、DB2、H2、HSQL、SQLite、Postgre、SQLServer2005、SQLServer 等多种数据库

  • 支持主键自动生成

    支持多达 4 种主键策略(内含分布式唯一 ID 生成器 - Sequence),可自由配置,完美解决主键问题

  • 支持 XML 热加载

    Mapper 对应的 XML 支持热加载,对于简单的 CRUD 操作,甚至可以无 XML 启动

  • 支持ActiveRecord模式

    支持 ActiveRecord 形式调用,实体类只需继承 Model 类即可进行强大的 CRUD 操作

  • 支持自定义全局通用操作

    支持全局通用方法注入( Write once, use anywhere )

  • 支持关键词自动转义

    支持数据库关键词(order、key……)自动转义,还可自定义关键词

  • 内置代码生成器

    采用代码或者 Maven 插件可快速生成 Mapper 、 Model 、 Service 、 Controller 层代码,支持模板引擎,更有超多自定义配置等您来使用

  • 内置分页插件

    基于 MyBatis 物理分页,开发者无需关心具体操作,配置好插件之后,写分页等同于普通 List查询

  • 内置性能分析插件

    可输出 Sql 语句以及其执行时间,建议开发测试时启用该功能,能快速揪出慢查询

  • 内置全局拦截插件

    提供全表 delete 、 update 操作智能分析阻断,也可自定义拦截规则,预防误操作

  • 内置Sql 注入剥离器

    支持 Sql 注入剥离,有效预防 Sql 注入攻击

架构
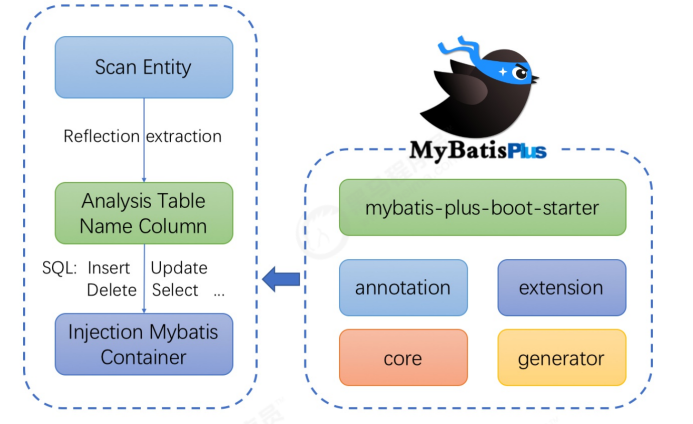
image-20230910152352231

作者

Mybatis-Plus是由baomidou(苞米豆)组织开发并且开源的,目前该组织大概有30人左右。

码云地址:https://gitee.com/organizations/baomidou

快速开始

对于Mybatis整合MP有常常有三种用法,分别是Mybatis+MP、Spring+Mybatis+MP、Spring Boot+Mybatis+MP。

创建数据库以及表

1
2
3
4
5
6
7
8
9
10
11
12
13
14
15
16
17
18
19
20
21
22
23
24
-- 创建测试库
CREATE DATABASE mp CHARACTER SET utf8mb4 COLLATE utf8mb4_unicode_ci;

-- 创建测试表
CREATE TABLE `tb_user` (
`id` bigint(20) NOT NULL AUTO_INCREMENT COMMENT '主键ID',
`user_name` varchar(20) NOT NULL COMMENT '用户名',
`password` varchar(20) NOT NULL COMMENT '密码',
`name` varchar(30) DEFAULT NULL COMMENT '姓名',
`age` int(11) DEFAULT NULL COMMENT '年龄',
`email` varchar(50) DEFAULT NULL COMMENT '邮箱',
PRIMARY KEY (`id`)
) ENGINE=InnoDB AUTO_INCREMENT=1 DEFAULT CHARSET=utf8;
-- 插入测试数据
INSERT INTO `tb_user` (`id`, `user_name`, `password`, `name`, `age`, `email`) VALUES
('1', 'zhangsan', '123456', '张三', '18', 'test1@itcast.cn');
INSERT INTO `tb_user` (`id`, `user_name`, `password`, `name`, `age`, `email`) VALUES
('2', 'lisi', '123456', '李四', '20', 'test2@itcast.cn');
INSERT INTO `tb_user` (`id`, `user_name`, `password`, `name`, `age`, `email`) VALUES
('3', 'wangwu', '123456', '王五', '28', 'test3@itcast.cn');
INSERT INTO `tb_user` (`id`, `user_name`, `password`, `name`, `age`, `email`) VALUES
('4', 'zhaoliu', '123456', '赵六', '21', 'test4@itcast.cn');
INSERT INTO `tb_user` (`id`, `user_name`, `password`, `name`, `age`, `email`) VALUES
('5', 'sunqi', '123456', '孙七', '24', 'test5@itcast.cn');

创建工程

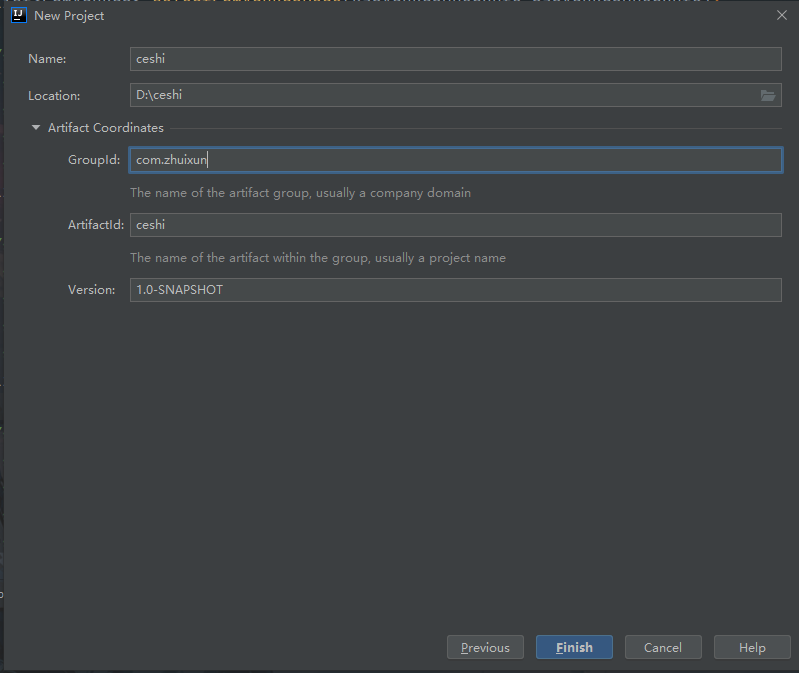
  • 创建一个空的Maven项目

image-20230910154242636

  • 导入依赖

    1
    2
    3
    4
    5
    6
    7
    8
    9
    10
    11
    12
    13
    14
    15
    16
    17
    18
    19
    20
    21
    22
    23
    24
    25
    26
    27
    28
    29
    30
    31
    32
    33
    34
    35
    36
    37
    38
    39
    40
    41
    42
    43
    44
    45
    46
    47
    48
    49
    50
    51
    52
    53
    54
    55
    56
    57
    58
    59
    60
    61
    62
    63
    <?xml version="1.0" encoding="UTF-8"?>
    <project xmlns="http://maven.apache.org/POM/4.0.0"
    xmlns:xsi="http://www.w3.org/2001/XMLSchema-instance"
    xsi:schemaLocation="http://maven.apache.org/POM/4.0.0
    http://maven.apache.org/xsd/maven-4.0.0.xsd">
    <modelVersion>4.0.0</modelVersion>
    <groupId>cn.itcast.mp</groupId>
    <artifactId>itcast-mybatis-plus</artifactId>
    <version>1.0-SNAPSHOT</version>
    <modules>
    <module>itcast-mybatis-plus-simple</module>
    </modules>
    <packaging>pom</packaging>
    <dependencies>
    <!-- mybatis-plus插件依赖 -->
    <dependency>
    <groupId>com.baomidou</groupId>
    <artifactId>mybatis-plus</artifactId>
    <version>3.1.1</version>
    </dependency>
    <!-- MySql -->
    <dependency>
    <groupId>mysql</groupId>
    <artifactId>mysql-connector-java</artifactId>
    <version>5.1.47</version>
    </dependency>
    <!-- 连接池 -->
    <dependency>
    <groupId>com.alibaba</groupId>
    <artifactId>druid</artifactId>
    <version>1.0.11</version>
    </dependency>
    <!--简化bean代码的工具包-->
    <dependency>
    <groupId>org.projectlombok</groupId>
    <artifactId>lombok</artifactId>
    <optional>true</optional>
    <version>1.18.4</version>
    </dependency>
    <dependency>
    <groupId>junit</groupId>
    <artifactId>junit</artifactId>
    <version>4.12</version>
    </dependency>
    <dependency>
    <groupId>org.slf4j</groupId>
    <artifactId>slf4j-log4j12</artifactId>
    <version>1.6.4</version>
    </dependency>
    </dependencies>
    <build>
    <plugins>
    <plugin>
    <groupId>org.apache.maven.plugins</groupId>
    <artifactId>maven-compiler-plugin</artifactId>
    <configuration>
    <source>1.8</source>
    <target>1.8</target>
    </configuration>
    </plugin>
    </plugins>
    </build>
    </project>

Mybatis+MP

下面演示,通过纯Mybatis与Mybatis-Plus整合。

创建子Module

1
2
3
4
5
6
7
8
9
10
11
12
13
14
<?xml version="1.0" encoding="UTF-8"?>
<project xmlns="http://maven.apache.org/POM/4.0.0"
xmlns:xsi="http://www.w3.org/2001/XMLSchema-instance"
xsi:schemaLocation="http://maven.apache.org/POM/4.0.0
http://maven.apache.org/xsd/maven-4.0.0.xsd">
<parent>
<artifactId>itcast-mybatis-plus</artifactId>
<groupId>cn.itcast.mp</groupId>
<version>1.0-SNAPSHOT</version>
</parent>
<modelVersion>4.0.0</modelVersion>
<packaging>jar</packaging>
<artifactId>itcast-mybatis-plus-simple</artifactId>
</project>

log4j.properties

1
2
3
4
log4j.rootLogger=DEBUG,A1
log4j.appender.A1=org.apache.log4j.ConsoleAppender
log4j.appender.A1.layout=org.apache.log4j.PatternLayout
log4j.appender.A1.layout.ConversionPattern=[%t] [%c]-[%p] %m%n

Mybatis实现查询User

  1. 编写mybatis-config.xml文件

    1
    2
    3
    4
    5
    6
    7
    8
    9
    10
    11
    12
    13
    14
    15
    16
    17
    18
    19
    20
    21
    <?xml version="1.0" encoding="UTF-8" ?>
    <!DOCTYPE configuration
    PUBLIC "-//mybatis.org//DTD Config 3.0//EN"
    "http://mybatis.org/dtd/mybatis-3-config.dtd">
    <configuration>
    <environments default="development">
    <environment id="development">
    <transactionManager type="JDBC"/>
    <dataSource type="POOLED">
    <property name="driver" value="com.mysql.jdbc.Driver"/>
    <property name="url" value="jdbc:mysql://127.0.0.1:3306/mp? useUnicode=true&amp;characterEncoding=utf8&amp;autoReconnect=true&amp;allowMultiQuerie
    s=true&amp;useSSL=false"/>
    <property name="username" value="root"/>
    <property name="password" value="root"/>
    </dataSource>
    </environment>
    </environments>
    <mappers>
    <mapper resource="UserMapper.xml"/>
    </mappers>
    </configuration>
  2. 编写User实体对象(这里使用lombok)

    1
    2
    3
    4
    5
    6
    7
    8
    9
    10
    11
    12
    13
    14
    15
    16
    package cn.itcast.mp.simple.pojo;
    import lombok.AllArgsConstructor;
    import lombok.Data;
    import lombok.NoArgsConstructor;

    @Data
    @NoArgsConstructor
    @AllArgsConstructor
    public class User {
    private Long id;
    private String userName;
    private String password;
    private String name;
    private Integer age;
    private String email;
    }
  3. 编写UserMapper接口

    1
    2
    3
    4
    5
    6
    7
    package cn.itcast.mp.simple.mapper;
    import cn.itcast.mp.simple.pojo.User;
    import java.util.List;

    public interface UserMapper {
    List<User> findAll();
    }
  4. 编写UserMapper.xml文件

    1
    2
    3
    4
    5
    6
    7
    8
    9
    <?xml version="1.0" encoding="UTF-8" ?>
    <!DOCTYPE mapper
    PUBLIC "-//mybatis.org//DTD Mapper 3.0//EN"
    "http://mybatis.org/dtd/mybatis-3-mapper.dtd">
    <mapper namespace="cn.itcast.mp.simple.mapper.UserMapper">
    <select id="findAll" resultType="cn.itcast.mp.simple.pojo.User">
    select * from tb_user
    </select>
    </mapper>
  5. 编写TestMybatis测试用例

    1
    2
    3
    4
    5
    6
    7
    8
    9
    10
    11
    12
    13
    14
    15
    16
    17
    18
    19
    20
    21
    22
    23
    24
    25
    26
    package cn.itcast.mp.simple;
    import cn.itcast.mp.simple.mapper.UserMapper;
    import cn.itcast.mp.simple.pojo.User;
    import org.apache.ibatis.io.Resources;
    import org.apache.ibatis.session.SqlSession;
    import org.apache.ibatis.session.SqlSessionFactory;
    import org.apache.ibatis.session.SqlSessionFactoryBuilder;
    import org.junit.Test;
    import java.io.InputStream;
    import java.util.List;

    public class TestMybatis {

    @Test
    public void testUserList() throws Exception{
    String resource = "mybatis-config.xml";
    InputStream inputStream = Resources.getResourceAsStream(resource);
    SqlSessionFactory sqlSessionFactory = new SqlSessionFactoryBuilder().build(inputStream);
    SqlSession sqlSession = sqlSessionFactory.openSession();
    UserMapper userMapper = sqlSession.getMapper(UserMapper.class);
    List<User> list = userMapper.findAll();
    for (User user : list) {
    System.out.println(user);
    }
    }
    }

Mybatis+MP实现查询User

  1. 将UserMapper继承BaseMapper,将拥有了BaseMapper中所有的方法

    1
    2
    3
    4
    5
    6
    7
    8
    package cn.itcast.mp.simple.mapper;
    import cn.itcast.mp.simple.pojo.User;
    import com.baomidou.mybatisplus.core.mapper.BaseMapper;
    import java.util.List;

    public interface UserMapper extends BaseMapper<User> {
    List<User> findAll();
    }
  2. 使用MP中的MybatisSqlSessionFactoryBuilder进程搭建

    1
    2
    3
    4
    5
    6
    7
    8
    9
    10
    11
    12
    13
    14
    15
    16
    17
    18
    19
    20
    21
    22
    23
    24
    25
    26
    27
    28
    package cn.itcast.mp.simple;
    import cn.itcast.mp.simple.mapper.UserMapper;
    import cn.itcast.mp.simple.pojo.User;
    import com.baomidou.mybatisplus.core.MybatisSqlSessionFactoryBuilder;
    import org.apache.ibatis.io.Resources;
    import org.apache.ibatis.session.SqlSession;
    import org.apache.ibatis.session.SqlSessionFactory;
    import org.apache.ibatis.session.SqlSessionFactoryBuilder;
    import org.junit.Test;
    import java.io.InputStream;
    import java.util.List;
    public class TestMybatisPlus {
    @Test
    public void testUserList() throws Exception{
    String resource = "mybatis-config.xml";
    InputStream inputStream = Resources.getResourceAsStream(resource);
    //这里使用的是MP中的MybatisSqlSessionFactoryBuilder
    SqlSessionFactory sqlSessionFactory = new
    MybatisSqlSessionFactoryBuilder().build(inputStream);
    SqlSession sqlSession = sqlSessionFactory.openSession();
    UserMapper userMapper = sqlSession.getMapper(UserMapper.class);
    // 可以调用BaseMapper中定义的方法
    List<User> list = userMapper.selectList(null);
    for (User user : list) {
    System.out.println(user);
    }
    }
    }

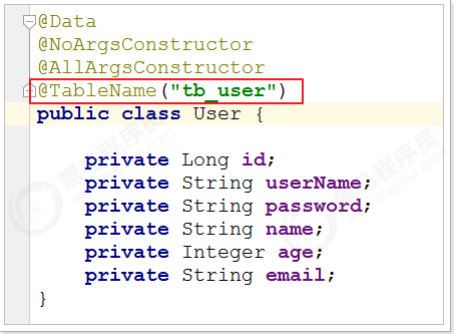
    运行报错:

    image-20230910163613588

解决:在User对象中添加@TableName,指定数据库表名

image-20230910164358607

​ 简单说明:由于使用了MybatisSqlSessionFactoryBuilder进行了构建,继承的BaseMapper中的方法就载入到了SqlSession中,所以就可以直接使用相关方法
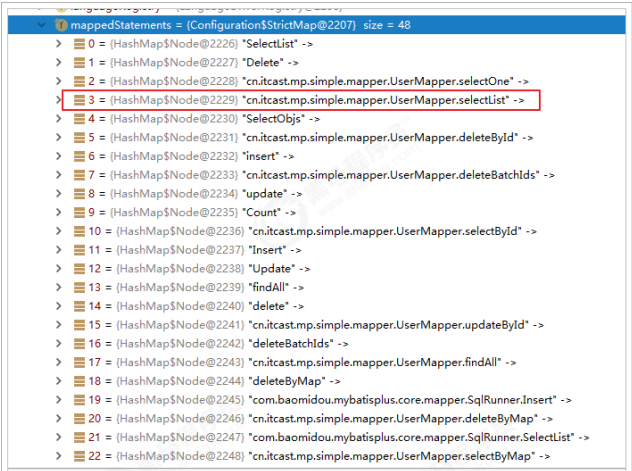
image-20230910164612534

Spring+Mybatis+MP

引入了Spring框架,数据源、构建等工作就交给了Spring管理

创建子Module

1
2
3
4
5
6
7
8
9
10
11
12
13
14
15
16
17
18
19
20
21
22
23
24
25
26
27
28
29
30
31
32
33
<?xml version="1.0" encoding="UTF-8"?>
<project xmlns="http://maven.apache.org/POM/4.0.0"
xmlns:xsi="http://www.w3.org/2001/XMLSchema-instance"
xsi:schemaLocation="http://maven.apache.org/POM/4.0.0
http://maven.apache.org/xsd/maven-4.0.0.xsd">
<parent>
<artifactId>itcast-mybatis-plus</artifactId>
<groupId>cn.itcast.mp</groupId>
<version>1.0-SNAPSHOT</version>
</parent>
<modelVersion>4.0.0</modelVersion>
<artifactId>itcast-mybatis-plus-spring</artifactId>
<properties>
<spring.version>5.1.6.RELEASE</spring.version>
</properties>
<dependencies>
<dependency>
<groupId>org.springframework</groupId>
<artifactId>spring-webmvc</artifactId>
<version>${spring.version}</version>
</dependency>
<dependency>
<groupId>org.springframework</groupId>
<artifactId>spring-jdbc</artifactId>
<version>${spring.version}</version>
</dependency>
<dependency>
<groupId>org.springframework</groupId>
<artifactId>spring-test</artifactId>
<version>${spring.version}</version>
</dependency>
</dependencies>
</project>

实现查询User

  1. 编写jdbc.properties

    1
    2
    3
    4
    5
    6
    jdbc.driver=com.mysql.jdbc.Driver
    jdbc.url=jdbc:mysql://127.0.0.1:3306/mp?
    useUnicode=true&characterEncoding=utf8&autoReconnect=true&allowMultiQueries=true&useSSL
    =false
    jdbc.username=root
    jdbc.password=root
  2. 编写applicationContext.xml

    1
    2
    3
    4
    5
    6
    7
    8
    9
    10
    11
    12
    13
    14
    15
    16
    17
    18
    19
    20
    21
    22
    23
    24
    25
    26
    27
    28
    29
    <?xml version="1.0" encoding="UTF-8"?>
    <beans xmlns="http://www.springframework.org/schema/beans"
    xmlns:xsi="http://www.w3.org/2001/XMLSchema-instance"
    xmlns:context="http://www.springframework.org/schema/context"
    xsi:schemaLocation="http://www.springframework.org/schema/beans
    http://www.springframework.org/schema/beans/spring-beans.xsd
    http://www.springframework.org/schema/context
    http://www.springframework.org/schema/context/spring-context.xsd">
    <context:property-placeholder location="classpath:*.properties"/>
    <!-- 定义数据源 -->
    <bean id="dataSource" class="com.alibaba.druid.pool.DruidDataSource"
    destroy-method="close">
    <property name="url" value="${jdbc.url}"/>
    <property name="username" value="${jdbc.username}"/>
    <property name="password" value="${jdbc.password}"/>
    <property name="driverClassName" value="${jdbc.driver}"/>
    <property name="maxActive" value="10"/>
    <property name="minIdle" value="5"/>
    </bean>
    <!--这里使用MP提供的sqlSessionFactory,完成了Spring与MP的整合-->
    <bean id="sqlSessionFactory"
    class="com.baomidou.mybatisplus.extension.spring.MybatisSqlSessionFactoryBean">
    <property name="dataSource" ref="dataSource"/>
    </bean>
    <!--扫描mapper接口,使用的依然是Mybatis原生的扫描器-->
    <bean class="org.mybatis.spring.mapper.MapperScannerConfigurer">
    <property name="basePackage" value="cn.itcast.mp.simple.mapper"/>
    </bean>
    </beans>
  3. 编写User对象以及UserMapper接口

    1
    2
    3
    4
    5
    6
    7
    8
    9
    10
    11
    12
    13
    14
    15
    16
    17
    18
    package cn.itcast.mp.simple.pojo;
    import com.baomidou.mybatisplus.annotation.TableName;
    import lombok.AllArgsConstructor;
    import lombok.Data;
    import lombok.NoArgsConstructor;

    @Data
    @NoArgsConstructor
    @AllArgsConstructor
    @TableName("tb_user")
    public class User {
    private Long id;
    private String userName;
    private String password;
    private String name;
    private Integer age;
    private String email;
    }
    1
    2
    3
    4
    5
    6
    package cn.itcast.mp.simple.mapper;
    import cn.itcast.mp.simple.pojo.User;
    import com.baomidou.mybatisplus.core.mapper.BaseMapper;
    public interface UserMapper extends BaseMapper<User> {

    }
  4. 编写测试用例

    1
    2
    3
    4
    5
    6
    7
    8
    9
    10
    11
    12
    13
    14
    15
    16
    17
    18
    19
    20
    21
    22
    23
    package cn.itcast.mp.simple;
    import cn.itcast.mp.simple.mapper.UserMapper;
    import cn.itcast.mp.simple.pojo.User;
    import org.junit.Test;
    import org.junit.runner.RunWith;
    import org.springframework.beans.factory.annotation.Autowired;
    import org.springframework.test.context.ContextConfiguration;
    import org.springframework.test.context.junit4.SpringJUnit4ClassRunner;
    import java.util.List;

    @RunWith(SpringJUnit4ClassRunner.class)
    @ContextConfiguration(locations = "classpath:applicationContext.xml")
    public class TestSpringMP {
    @Autowired
    private UserMapper userMapper;
    @Test
    public void testSelectList(){
    List<User> users = this.userMapper.selectList(null);
    for (User user : users) {
    System.out.println(user);
    }
    }
    }

SpringBoot+Mybatis+MP

使用SpringBoot将进一步的简化MP的整合,需要注意的是,由于使用SpringBoot需要继承parent,所以需要重新创建工程,并不是创建子Module。

创建工程
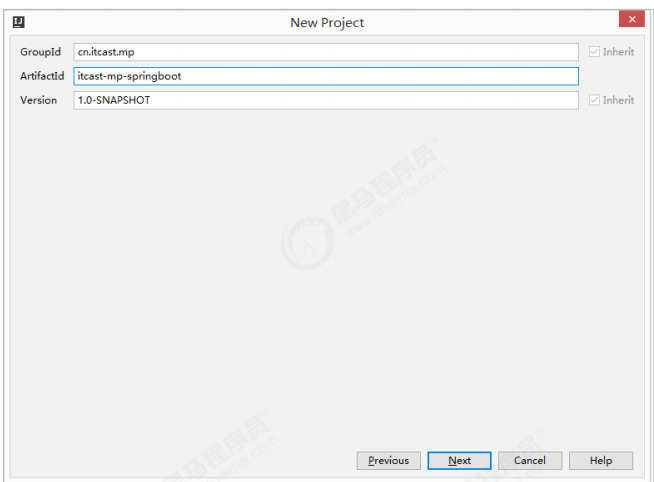
image-20230910171339507

导入依赖

1
2
3
4
5
6
7
8
9
10
11
12
13
14
15
16
17
18
19
20
21
22
23
24
25
26
27
28
29
30
31
32
33
34
35
36
37
38
39
40
41
42
43
44
45
46
47
48
49
50
51
52
53
54
55
56
57
58
59
60
61
62
63
<?xml version="1.0" encoding="UTF-8"?>
<project xmlns="http://maven.apache.org/POM/4.0.0"
xmlns:xsi="http://www.w3.org/2001/XMLSchema-instance"
xsi:schemaLocation="http://maven.apache.org/POM/4.0.0
http://maven.apache.org/xsd/maven-4.0.0.xsd">
<modelVersion>4.0.0</modelVersion>

<parent>
<groupId>org.springframework.boot</groupId>
<artifactId>spring-boot-starter-parent</artifactId>
<version>2.1.4.RELEASE</version>
</parent>
<groupId>cn.itcast.mp</groupId>
<artifactId>itcast-mp-springboot</artifactId>
<version>1.0-SNAPSHOT</version>
<dependencies>
<dependency>
<groupId>org.springframework.boot</groupId>
<artifactId>spring-boot-starter</artifactId>
<exclusions>
<exclusion>
<groupId>org.springframework.boot</groupId>
<artifactId>spring-boot-starter-logging</artifactId>
</exclusion>
</exclusions>
</dependency>
<dependency>
<groupId>org.springframework.boot</groupId>
<artifactId>spring-boot-starter-test</artifactId>
<scope>test</scope>
</dependency>
<!--简化代码的工具包-->
<dependency>
<groupId>org.projectlombok</groupId>
<artifactId>lombok</artifactId>
<optional>true</optional>
</dependency>
<!--mybatis-plus的springboot支持-->
<dependency>
<groupId>com.baomidou</groupId>
<artifactId>mybatis-plus-boot-starter</artifactId>
<version>3.1.1</version>
</dependency>
<!--mysql驱动-->
<dependency>
<groupId>mysql</groupId>
<artifactId>mysql-connector-java</artifactId>
<version>5.1.47</version>
</dependency>
<dependency>
<groupId>org.slf4j</groupId>
<artifactId>slf4j-log4j12</artifactId>
</dependency>
</dependencies>
<build>
<plugins>
<plugin>
<groupId>org.springframework.boot</groupId>
<artifactId>spring-boot-maven-plugin</artifactId>
</plugin>
</plugins>
</build>
</project>
1
2
3
4
log4j.rootLogger=DEBUG,A1
log4j.appender.A1=org.apache.log4j.ConsoleAppender
log4j.appender.A1.layout=org.apache.log4j.PatternLayout
log4j.appender.A1.layout.ConversionPattern=[%t] [%c]-[%p] %m%n

编写application.properties

1
2
3
4
5
6
7
spring.application.name = itcast-mp-springboot
spring.datasource.driver-class-name=com.mysql.jdbc.Driver
spring.datasource.url=jdbc:mysql://127.0.0.1:3306/mp?
useUnicode=true&characterEncoding=utf8&autoReconnect=true&allowMultiQueries=true&useSSL
=false
spring.datasource.username=root
spring.datasource.password=root

编写pojo

1
2
3
4
5
6
7
8
9
10
11
12
13
14
15
16
17
18
package cn.itcast.mp.pojo;
import com.baomidou.mybatisplus.annotation.TableName;
import lombok.AllArgsConstructor;
import lombok.Data;
import lombok.NoArgsConstructor;

@Data
@NoArgsConstructor
@AllArgsConstructor
@TableName("tb_user")
public class User {
private Long id;
private String userName;
private String password;
private String name;
private Integer age;
private String email;
}

编写mapper

1
2
3
4
5
6
package cn.itcast.mp.mapper;
import cn.itcast.mp.pojo.User;
import com.baomidou.mybatisplus.core.mapper.BaseMapper;

public interface UserMapper extends BaseMapper<User> {
}

编写启动类

1
2
3
4
5
6
7
8
9
10
11
12
13
package cn.itcast.mp;
import org.mybatis.spring.annotation.MapperScan;
import org.springframework.boot.SpringApplication;
import org.springframework.boot.WebApplicationType;
import org.springframework.boot.autoconfigure.SpringBootApplication;
import org.springframework.boot.builder.SpringApplicationBuilder;
@MapperScan("cn.itcast.mp.mapper") //设置mapper接口的扫描包
@SpringBootApplication
public class MyApplication {
public static void main(String[] args) {
SpringApplication.run(MyApplication.class, args);
}
}

编写测试用例

1
2
3
4
5
6
7
8
9
10
11
12
13
14
15
16
17
18
19
20
21
22
23
package cn.itcast.mp;
import cn.itcast.mp.mapper.UserMapper;
import cn.itcast.mp.pojo.User;
import org.junit.Test;
import org.junit.runner.RunWith;
import org.springframework.beans.factory.annotation.Autowired;
import org.springframework.boot.test.context.SpringBootTest;
import org.springframework.test.context.junit4.SpringRunner;
import java.util.List;

@RunWith(SpringRunner.class)
@SpringBootTest
public class UserMapperTest {
@Autowired
private UserMapper userMapper;
@Test
public void testSelect() {
List<User> userList = userMapper.selectList(null);
for (User user : userList) {
System.out.println(user);
}
}
}

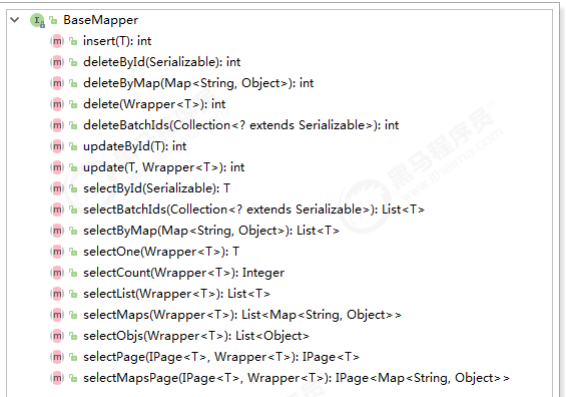
通用CRUD

image-20230910172306235

插入操作

方法定义

1
2
3
4
5
6
/**
* 插入一条记录
*
* @param entity 实体对象
*/
int insert(T entity);

测试用例

1
2
3
4
5
6
7
8
9
10
11
12
13
14
15
16
17
18
19
20
21
22
23
24
25
26
27
28
29
30
31
package cn.itcast.mp;
import cn.itcast.mp.mapper.UserMapper;
import cn.itcast.mp.pojo.User;
import org.junit.Test;
import org.junit.runner.RunWith;
import org.springframework.beans.factory.annotation.Autowired;
import org.springframework.boot.test.context.SpringBootTest;
import org.springframework.test.context.junit4.SpringRunner;
import java.util.List;

@RunWith(SpringRunner.class)
@SpringBootTest
public class UserMapperTest {

@Autowired
private UserMapper userMapper;

@Test
public void testInsert(){
User user = new User();
user.setAge(20);
user.setEmail("test@itcast.cn");
user.setName("曹操");
user.setUserName("caocao");
user.setPassword("123456");
int result = this.userMapper.insert(user); //返回的result是受影响的行数,并不是自增
后的id
System.out.println("result = " + result);
System.out.println(user.getId()); //自增后的id会回填到对象中
}
}

数据已经写入到了数据库,但是,id的值不正确,我们期望的是数据库自增长,实际是MP生成了id的值写入到了数据库

MP的id策略

1
2
3
4
5
6
7
8
9
10
11
12
13
14
15
16
17
18
19
20
21
22
23
24
25
26
27
28
29
30
31
32
33
34
35
36
37
38
39
40
41
package com.baomidou.mybatisplus.annotation;
import lombok.Getter;
/**
* 生成ID类型枚举类
*
* @author hubin
* @since 2015-11-10
*/
@Getter
public enum IdType {
/**
* 数据库ID自增
*/
AUTO(0),
/**
* 该类型为未设置主键类型
*/
NONE(1),
/**
* 用户输入ID
* <p>该类型可以通过自己注册自动填充插件进行填充</p>
*/
INPUT(2),
/* 以下3种类型、只有当插入对象ID 为空,才自动填充。 */
/**
* 全局唯一ID (idWorker)
*/
ID_WORKER(3),
/**
* 全局唯一ID (UUID)
*/
UUID(4),
/**
* 字符串全局唯一ID (idWorker 的字符串表示)
*/
ID_WORKER_STR(5);
private final int key;
IdType(int key) {
this.key = key;
}
}

修改User对象

1
2
3
4
5
6
7
8
9
10
11
12
13
14
15
16
17
18
19
20
21
package cn.itcast.mp.pojo;
import com.baomidou.mybatisplus.annotation.IdType;
import com.baomidou.mybatisplus.annotation.TableId;
import com.baomidou.mybatisplus.annotation.TableName;
import lombok.AllArgsConstructor;
import lombok.Data;
import lombok.NoArgsConstructor;

@Data
@NoArgsConstructor
@AllArgsConstructor
@TableName("tb_user")
public class User {
@TableId(type = IdType.AUTO) //指定id类型为自增长
private Long id;
private String userName;
private String password;
private String name;
private Integer age;
private String email;
}

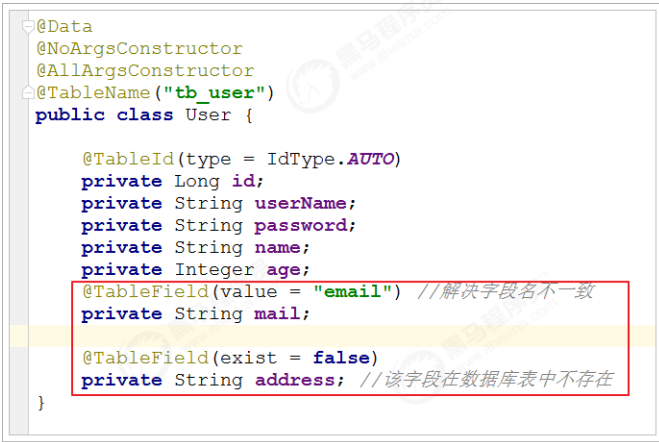
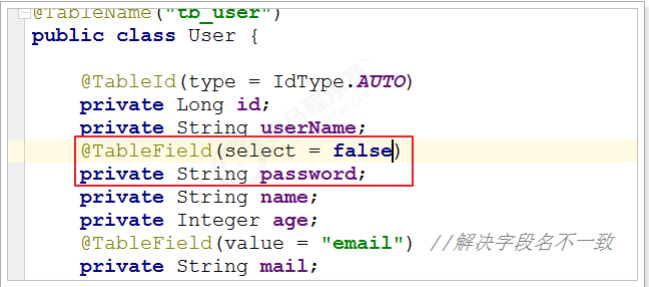
@TableField

在MP中通过@TableField注解可以指定字段的一些属性,常常解决的问题有2个:

  1. 对象中的属性名和字段名不一致的问题(非驼峰)

  2. 对象中的属性字段在表中不存在的问题

image-20230910173351156

其他用法,如把字段不加入查询字段

image-20230910173423329

更新操作

在MP中,更新操作有2种,一种是根据id更新,另一种是根据条件更新

根据id更新

  • 方法定义
1
2
3
4
5
6
/**
* 根据 ID 修改
*
* @param entity 实体对象
*/
int updateById(@Param(Constants.ENTITY) T entity);
  • 测试
1
2
3
4
5
6
7
8
9
10
11
12
13
14
15
16
@RunWith(SpringRunner.class)
@SpringBootTest
public class UserMapperTest {

@Autowired
private UserMapper userMapper;

@Test
public void testUpdateById() {
User user = new User();
user.setId(6L); //主键
user.setAge(21); //更新的字段
//根据id更新,更新不为null的字段
this.userMapper.updateById(user);
}
}

根据条件更新

  • 方法定义

    1
    2
    3
    4
    5
    6
    7
    8
    /**
    * 根据 whereEntity 条件,更新记录
    *
    * @param entity 实体对象 (set 条件值,可以为 null)
    * @param updateWrapper 实体对象封装操作类(可以为 null,里面的 entity 用于生成 where 语句)
    */
    int update(@Param(Constants.ENTITY) T entity, @Param(Constants.WRAPPER) Wrapper<T>
    updateWrapper);
  • 测试用例

    1
    2
    3
    4
    5
    6
    7
    8
    9
    10
    11
    12
    13
    14
    15
    16
    17
    18
    19
    20
    21
    22
    23
    24
    25
    26
    27
    28
    29
    30
    31
    32
    package cn.itcast.mp;
    import cn.itcast.mp.mapper.UserMapper;
    import cn.itcast.mp.pojo.User;
    import com.baomidou.mybatisplus.core.conditions.Wrapper;
    import com.baomidou.mybatisplus.core.conditions.query.QueryWrapper;
    import com.baomidou.mybatisplus.core.conditions.update.UpdateWrapper;
    import net.minidev.json.writer.UpdaterMapper;
    import org.junit.Test;
    import org.junit.runner.RunWith;
    import org.springframework.beans.factory.annotation.Autowired;
    import org.springframework.boot.test.context.SpringBootTest;
    import org.springframework.test.context.junit4.SpringRunner;
    import java.util.List;

    @RunWith(SpringRunner.class)
    @SpringBootTest
    public class UserMapperTest {

    @Autowired
    private UserMapper userMapper;
    @Test
    public void testUpdate() {
    User user = new User();
    user.setAge(22); //更新的字段
    //更新的条件
    QueryWrapper<User> wrapper = new QueryWrapper<>();
    wrapper.eq("id", 6);
    //执行更新操作
    int result = this.userMapper.update(user, wrapper);
    System.out.println("result = " + result);
    }
    }

    或者,通过UpdateWrapper进行更新

    1
    2
    3
    4
    5
    6
    7
    8
    9
    @Test
    public void testUpdate() {
    //更新的条件以及字段
    UpdateWrapper<User> wrapper = new UpdateWrapper<>();
    wrapper.eq("id", 6).set("age", 23);
    //执行更新操作
    int result = this.userMapper.update(null, wrapper);
    System.out.println("result = " + result);
    }

删除操作

deleteById

  • 方法定义

    1
    2
    3
    4
    5
    6
    /**
    * 根据 ID 删除
    *
    * @param id 主键ID
    */
    int deleteById(Serializable id);
  • 测试用例

    1
    2
    3
    4
    5
    6
    7
    8
    9
    10
    11
    12
    13
    14
    15
    16
    17
    18
    19
    package cn.itcast.mp;
    import cn.itcast.mp.mapper.UserMapper;
    import org.junit.Test;
    import org.junit.runner.RunWith;
    import org.springframework.beans.factory.annotation.Autowired;
    import org.springframework.boot.test.context.SpringBootTest;
    import org.springframework.test.context.junit4.SpringRunner;
    @RunWith(SpringRunner.class)
    @SpringBootTest
    public class UserMapperTest {
    @Autowired
    private UserMapper userMapper;
    @Test
    public void testDeleteById() {
    //执行删除操作
    int result = this.userMapper.deleteById(6L);
    System.out.println("result = " + result);
    }
    }

deleteByMap

  • 方法定义

    1
    2
    3
    4
    5
    6
    /**
    * 根据 columnMap 条件,删除记录
    *
    * @param columnMap 表字段 map 对象
    */
    int deleteByMap(@Param(Constants.COLUMN_MAP) Map<String, Object> columnMap);
  • 测试用例

    1
    2
    3
    4
    5
    6
    7
    8
    9
    10
    11
    12
    13
    14
    15
    16
    17
    18
    19
    20
    21
    22
    23
    24
    25
    26
    27
    package cn.itcast.mp;
    import cn.itcast.mp.mapper.UserMapper;
    import org.junit.Test;
    import org.junit.runner.RunWith;
    import org.springframework.beans.factory.annotation.Autowired;
    import org.springframework.boot.test.context.SpringBootTest;
    import org.springframework.test.context.junit4.SpringRunner;
    import java.util.HashMap;
    import java.util.Map;

    @RunWith(SpringRunner.class)
    @SpringBootTest
    public class UserMapperTest {

    @Autowired
    private UserMapper userMapper;

    @Test
    public void testDeleteByMap() {
    Map<String, Object> columnMap = new HashMap<>();
    columnMap.put("age",20);
    columnMap.put("name","张三");
    //将columnMap中的元素设置为删除的条件,多个之间为and关系
    int result = this.userMapper.deleteByMap(columnMap);
    System.out.println("result = " + result);
    }
    }

delete

  • 方法定义

    1
    2
    3
    4
    5
    6
    /**
    * 根据 entity 条件,删除记录
    *
    * @param wrapper 实体对象封装操作类(可以为 null)
    */
    int delete(@Param(Constants.WRAPPER) Wrapper<T> wrapper);
  • 测试用例

    1
    2
    3
    4
    5
    6
    7
    8
    9
    10
    11
    12
    13
    14
    15
    16
    17
    18
    19
    20
    21
    22
    23
    24
    25
    26
    27
    28
    29
    30
    package cn.itcast.mp;
    import cn.itcast.mp.mapper.UserMapper;
    import cn.itcast.mp.pojo.User;
    import com.baomidou.mybatisplus.core.conditions.query.QueryWrapper;
    import org.junit.Test;
    import org.junit.runner.RunWith;
    import org.springframework.beans.factory.annotation.Autowired;
    import org.springframework.boot.test.context.SpringBootTest;
    import org.springframework.test.context.junit4.SpringRunner;
    import java.util.HashMap;
    import java.util.Map;

    @RunWith(SpringRunner.class)
    @SpringBootTest
    public class UserMapperTest {

    @Autowired
    private UserMapper userMapper;

    @Test
    public void testDeleteByMap() {
    User user = new User();
    user.setAge(20);
    user.setName("张三");
    //将实体对象进行包装,包装为操作条件
    QueryWrapper<User> wrapper = new QueryWrapper<>(user);
    int result = this.userMapper.delete(wrapper);
    System.out.println("result = " + result);
    }
    }

deleteBatchIds

  • 方法定义

    1
    2
    3
    4
    5
    6
    7
    /**
    * 删除(根据ID 批量删除)
    *
    * @param idList 主键ID列表(不能为 null 以及 empty)
    */
    int deleteBatchIds(@Param(Constants.COLLECTION) Collection<? extends Serializable>
    idList);
  • 测试用例

    1
    2
    3
    4
    5
    6
    7
    8
    9
    10
    11
    12
    13
    14
    15
    16
    17
    18
    19
    20
    21
    package cn.itcast.mp;
    import cn.itcast.mp.mapper.UserMapper;
    import org.junit.Test;
    import org.junit.runner.RunWith;
    import org.springframework.beans.factory.annotation.Autowired;
    import org.springframework.boot.test.context.SpringBootTest;
    import org.springframework.test.context.junit4.SpringRunner;
    import java.util.Arrays;

    @RunWith(SpringRunner.class)
    @SpringBootTest
    public class UserMapperTest {
    @Autowired
    private UserMapper userMapper;
    @Test
    public void testDeleteByMap() {
    //根据id集合批量删除
    int result = this.userMapper.deleteBatchIds(Arrays.asList(1L,10L,20L));
    System.out.println("result = " + result);
    }
    }

查询操作

MP提供了多种查询操作,包括根据id查询、批量查询、查询单条数据、查询列表、分页查询等操作

selectById

  • 方法定义

    1
    2
    3
    4
    5
    6
    /**
    * 根据 ID 查询
    *
    * @param id 主键ID
    */
    T selectById(Serializable id);
  • 测试用例

    1
    2
    3
    4
    5
    6
    7
    8
    9
    10
    11
    12
    13
    14
    15
    16
    17
    18
    19
    20
    21
    package cn.itcast.mp;
    import cn.itcast.mp.mapper.UserMapper;
    import cn.itcast.mp.pojo.User;
    import org.junit.Test;
    import org.junit.runner.RunWith;
    import org.springframework.beans.factory.annotation.Autowired;
    import org.springframework.boot.test.context.SpringBootTest;
    import org.springframework.test.context.junit4.SpringRunner;

    @RunWith(SpringRunner.class)
    @SpringBootTest
    public class UserMapperTest {
    @Autowired
    private UserMapper userMapper;
    @Test
    public void testSelectById() {
    //根据id查询数据
    User user = this.userMapper.selectById(2L);
    System.out.println("result = " + user);
    }
    }

selectBatchIds

  • 方法定义

    1
    2
    3
    4
    5
    6
    7
    /**
    * 查询(根据ID 批量查询)
    *
    * @param idList 主键ID列表(不能为 null 以及 empty)
    */
    List<T> selectBatchIds(@Param(Constants.COLLECTION) Collection<? extends Serializable>
    idList);
  • 测试用例

    1
    2
    3
    4
    5
    6
    7
    8
    9
    10
    11
    12
    13
    14
    15
    16
    17
    18
    19
    20
    21
    22
    23
    24
    25
    package cn.itcast.mp;
    import cn.itcast.mp.mapper.UserMapper;
    import cn.itcast.mp.pojo.User;
    import org.junit.Test;
    import org.junit.runner.RunWith;
    import org.springframework.beans.factory.annotation.Autowired;
    import org.springframework.boot.test.context.SpringBootTest;
    import org.springframework.test.context.junit4.SpringRunner;
    import java.util.Arrays;
    import java.util.List;

    @RunWith(SpringRunner.class)
    @SpringBootTest
    public class UserMapperTest {
    @Autowired
    private UserMapper userMapper;
    @Test
    public void testSelectBatchIds() {
    //根据id集合批量查询
    List<User> users = this.userMapper.selectBatchIds(Arrays.asList(2L, 3L, 10L));
    for (User user : users) {
    System.out.println(user);
    }
    }
    }

selectOne

  • 方法定义

    1
    2
    3
    4
    5
    6
    /**
    * 根据 entity 条件,查询一条记录
    *
    * @param queryWrapper 实体对象封装操作类(可以为 null)
    */
    T selectOne(@Param(Constants.WRAPPER) Wrapper<T> queryWrapper);
  • 测试用例

    1
    2
    3
    4
    5
    6
    7
    8
    9
    10
    11
    12
    13
    14
    15
    16
    17
    18
    19
    20
    21
    22
    23
    24
    25
    26
    package cn.itcast.mp;
    import cn.itcast.mp.mapper.UserMapper;
    import cn.itcast.mp.pojo.User;
    import com.baomidou.mybatisplus.core.conditions.query.QueryWrapper;
    import org.junit.Test;
    import org.junit.runner.RunWith;
    import org.springframework.beans.factory.annotation.Autowired;
    import org.springframework.boot.test.context.SpringBootTest;
    import org.springframework.test.context.junit4.SpringRunner;

    @RunWith(SpringRunner.class)
    @SpringBootTest
    public class UserMapperTest {

    @Autowired
    private UserMapper userMapper;

    @Test
    public void testSelectOne() {
    QueryWrapper<User> wrapper = new QueryWrapper<User>();
    wrapper.eq("name", "李四");
    //根据条件查询一条数据,如果结果超过一条会报错
    User user = this.userMapper.selectOne(wrapper);
    System.out.println(user);
    }
    }

selectCount

  • 方法定义

    1
    2
    3
    4
    5
    6
    /**
    * 根据 Wrapper 条件,查询总记录数
    *
    * @param queryWrapper 实体对象封装操作类(可以为 null)
    */
    Integer selectCount(@Param(Constants.WRAPPER) Wrapper<T> queryWrapper);
  • 测试用例

    1
    2
    3
    4
    5
    6
    7
    8
    9
    10
    11
    12
    13
    14
    15
    16
    17
    18
    19
    20
    21
    22
    23
    24
    25
    package cn.itcast.mp;
    import cn.itcast.mp.mapper.UserMapper;
    import cn.itcast.mp.pojo.User;
    import com.baomidou.mybatisplus.core.conditions.query.QueryWrapper;
    import org.junit.Test;
    import org.junit.runner.RunWith;
    import org.springframework.beans.factory.annotation.Autowired;
    import org.springframework.boot.test.context.SpringBootTest;
    import org.springframework.test.context.junit4.SpringRunner;

    @RunWith(SpringRunner.class)
    @SpringBootTest
    public class UserMapperTest {
    @Autowired
    private UserMapper userMapper;

    @Test
    public void testSelectCount() {
    QueryWrapper<User> wrapper = new QueryWrapper<User>();
    wrapper.gt("age", 23); //年龄大于23岁
    //根据条件查询数据条数
    Integer count = this.userMapper.selectCount(wrapper);
    System.out.println("count = " + count);
    }
    }

selectList

  • 方法定义

    1
    2
    3
    4
    5
    6
    /**
    * 根据 entity 条件,查询全部记录
    *
    * @param queryWrapper 实体对象封装操作类(可以为 null)
    */
    List<T> selectList(@Param(Constants.WRAPPER) Wrapper<T> queryWrapper);
  • 测试用例

    1
    2
    3
    4
    5
    6
    7
    8
    9
    10
    11
    12
    13
    14
    15
    16
    17
    18
    19
    20
    21
    22
    23
    24
    25
    26
    27
    package cn.itcast.mp;
    import cn.itcast.mp.mapper.UserMapper;
    import cn.itcast.mp.pojo.User;
    import com.baomidou.mybatisplus.core.conditions.query.QueryWrapper;
    import org.junit.Test;
    import org.junit.runner.RunWith;
    import org.springframework.beans.factory.annotation.Autowired;
    import org.springframework.boot.test.context.SpringBootTest;
    import org.springframework.test.context.junit4.SpringRunner;
    import java.util.List;

    @RunWith(SpringRunner.class)
    @SpringBootTest
    public class UserMapperTest {
    @Autowired
    private UserMapper userMapper;
    @Test
    public void testSelectList() {
    QueryWrapper<User> wrapper = new QueryWrapper<User>();
    wrapper.gt("age", 23); //年龄大于23岁
    //根据条件查询数据
    List<User> users = this.userMapper.selectList(wrapper);
    for (User user : users) {
    System.out.println("user = " + user);
    }
    }
    }

selectPage

  • 方法定义

    1
    2
    3
    4
    5
    6
    7
    /**
    * 根据 entity 条件,查询全部记录(并翻页)
    *
    * @param page 分页查询条件(可以为 RowBounds.DEFAULT)
    * @param queryWrapper 实体对象封装操作类(可以为 null)
    */
    IPage<T> selectPage(IPage<T> page, @Param(Constants.WRAPPER) Wrapper<T> queryWrapper);
  • 配置分页插件

    1
    2
    3
    4
    5
    6
    7
    8
    9
    10
    11
    12
    13
    14
    15
    16
    17
    package cn.itcast.mp;
    import com.baomidou.mybatisplus.extension.plugins.PaginationInterceptor;
    import org.mybatis.spring.annotation.MapperScan;
    import org.springframework.context.annotation.Bean;
    import org.springframework.context.annotation.Configuration;

    @Configuration
    @MapperScan("cn.itcast.mp.mapper") //设置mapper接口的扫描包
    public class MybatisPlusConfig {
    /**
    * 分页插件
    */
    @Bean
    public PaginationInterceptor paginationInterceptor() {
    return new PaginationInterceptor();
    }
    }
  • 测试用例

    1
    2
    3
    4
    5
    6
    7
    8
    9
    10
    11
    12
    13
    14
    15
    16
    17
    18
    19
    20
    21
    22
    23
    24
    25
    26
    27
    28
    29
    30
    31
    32
    33
    package cn.itcast.mp;
    import cn.itcast.mp.mapper.UserMapper;
    import cn.itcast.mp.pojo.User;
    import com.baomidou.mybatisplus.core.conditions.query.QueryWrapper;
    import com.baomidou.mybatisplus.core.metadata.IPage;
    import com.baomidou.mybatisplus.extension.plugins.pagination.Page;
    import org.junit.Test;
    import org.junit.runner.RunWith;
    import org.springframework.beans.factory.annotation.Autowired;
    import org.springframework.boot.test.context.SpringBootTest;
    import org.springframework.test.context.junit4.SpringRunner;
    import java.util.List;

    @RunWith(SpringRunner.class)
    @SpringBootTest
    public class UserMapperTest {
    @Autowired
    private UserMapper userMapper;
    @Test
    public void testSelectPage() {
    QueryWrapper<User> wrapper = new QueryWrapper<User>();
    wrapper.gt("age", 20); //年龄大于20岁
    Page<User> page = new Page<>(1,1);
    //根据条件查询数据
    IPage<User> iPage = this.userMapper.selectPage(page, wrapper);
    System.out.println("数据总条数:" + iPage.getTotal());
    System.out.println("总页数:" + iPage.getPages());
    List<User> users = iPage.getRecords();
    for (User user : users) {
    System.out.println("user = " + user);
    }
    }
    }

SQL注入原理

MP在启动后会将BaseMapper中的一系列的方法注册到meppedStatements中,那么究竟是如何注入的呢?流程又是怎么样的?下面我们将一起来分析下。

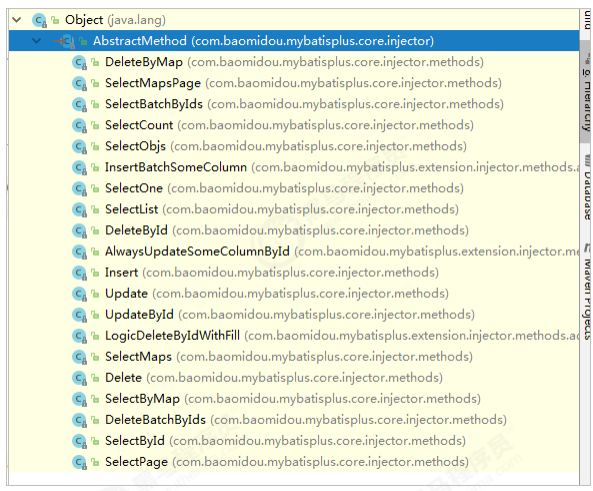
在MP中,ISqlInjector负责SQL的注入工作,它是一个接口,AbstractSqlInjector是它的实现类,实现关系如下:

image-20230910175756778

在AbstractSqlInjector中,主要是由inspectInject()方法进行注入的,如下:

1
2
3
4
5
6
7
8
9
10
11
12
13
14
15
16
17
18
19
20
21
22
@Override
public void inspectInject(MapperBuilderAssistant builderAssistant, Class<?>
mapperClass) {
Class<?> modelClass = extractModelClass(mapperClass);
if (modelClass != null) {
String className = mapperClass.toString();
Set<String> mapperRegistryCache =
GlobalConfigUtils.getMapperRegistryCache(builderAssistant.getConfiguration());
if (!mapperRegistryCache.contains(className)) {
List<AbstractMethod> methodList = this.getMethodList();
if (CollectionUtils.isNotEmpty(methodList)) {
TableInfo tableInfo = TableInfoHelper.initTableInfo(builderAssistant,modelClass);
// 循环注入自定义方法
methodList.forEach(m -> m.inject(builderAssistant, mapperClass,
modelClass, tableInfo));
} else {
logger.debug(mapperClass.toString() + ", No effective injection method was found.");
}
mapperRegistryCache.add(className);
}
}
}

在实现方法中, methodList.forEach(m -> m.inject(builderAssistant, mapperClass, modelClass,tableInfo)); 是关键,循环遍历方法,进行注入。

最终调用抽象方法injectMappedStatement进行真正的注入

1
2
3
4
5
6
7
8
9
10
/**
* 注入自定义 MappedStatement
*
* @param mapperClass mapper 接口
* @param modelClass mapper 泛型
* @param tableInfo 数据库表反射信息
* @return MappedStatement
*/
public abstract MappedStatement injectMappedStatement(Class<?> mapperClass, Class<?
> modelClass, TableInfo tableInfo);

查看该方法的实现:

image-20230911090656916

以selectById为例查看:

1
2
3
4
5
6
7
8
9
10
11
public class SelectById extends AbstractMethod {
@Override
public MappedStatement injectMappedStatement(Class<?> mapperClass, Class<?>
modelClass, TableInfo tableInfo) {
SqlMethod sqlMethod = SqlMethod.LOGIC_SELECT_BY_ID;
SqlSource sqlSource = new RawSqlSource(configuration,String.format(sqlMethod.getSql(),
sqlSelectColumns(tableInfo, false),tableInfo.getTableName(), tableInfo.getKeyColumn(),
tableInfo.getKeyProperty(),tableInfo.getLogicDeleteSql(true, false)), Object.class);
return this.addSelectMappedStatement(mapperClass, sqlMethod.getMethod(),sqlSource, modelClass, tableInfo);
}
}

可以看到,生成了SqlSource对象,再将SQL通过addSelectMappedSatement方法添加到meppedStatements中。

image-20230911090937930

配置

在MP中有大量的配置,其中有一部分是Mybatis原生的配置,另一部分是MP的配置,详情:https://mybatis.plus/confifig/

基本配置

configLocation

MyBatis 配置文件位置,如果您有单独的 MyBatis 配置,请将其路径配置到 confifigLocation 中。 MyBatisConfifiguration 的具体内容请参考MyBatis 官方文档

  • SpringBoot

    1
    mybatis-plus.config-location = classpath:mybatis-config.xml
  • SpirngMVC

    1
    2
    3
    <bean id="sqlSessionFactory" class="com.baomidou.mybatisplus.extension.spring.MybatisSqlSessionFactoryBean">
    <property name="configLocation" value="classpath:mybatis-config.xml"/>
    </bean>

mapperLocations

MyBatis Mapper 所对应的 XML 文件位置,如果您在 Mapper 中有自定义方法(XML 中有自定义实现),需要进行该配置,告诉 Mapper 所对应的 XML 文件位置。

  • Spring Boot

    1
    mybatis-plus.mapper-locations = classpath*:mybatis/*.xml
  • Spring MVC

    1
    2
    3
    4
    <bean id="sqlSessionFactory"
    class="com.baomidou.mybatisplus.extension.spring.MybatisSqlSessionFactoryBean">
    <property name="mapperLocations" value="classpath*:mybatis/*.xml"/>
    </bean>

    Maven多模块项目的扫描路径需以 classpath*: 开头 (即加载多个 jar 包下的XML 文件)

  • 测试

    1
    2
    3
    4
    5
    6
    7
    8
    9
    <?xml version="1.0" encoding="UTF-8" ?>
    <!DOCTYPE mapper
    PUBLIC "-//mybatis.org//DTD Mapper 3.0//EN"
    "http://mybatis.org/dtd/mybatis-3-mapper.dtd">
    <mapper namespace="cn.itcast.mp.mapper.UserMapper">
    <select id="findById" resultType="cn.itcast.mp.pojo.User">
    select * from tb_user where id = #{id}
    </select>
    </mapper>
    1
    2
    3
    4
    5
    6
    7
    package cn.itcast.mp.mapper;
    import cn.itcast.mp.pojo.User;
    import com.baomidou.mybatisplus.core.mapper.BaseMapper;

    public interface UserMapper extends BaseMapper<User> {
    User findById(Long id);
    }
    1
    2
    3
    4
    5
    6
    7
    8
    9
    10
    11
    12
    13
    14
    15
    16
    17
    18
    19
    20
    package cn.itcast.mp;
    import cn.itcast.mp.mapper.UserMapper;
    import cn.itcast.mp.pojo.User;
    import org.junit.Test;
    import org.junit.runner.RunWith;
    import org.springframework.beans.factory.annotation.Autowired;
    import org.springframework.boot.test.context.SpringBootTest;
    import org.springframework.test.context.junit4.SpringRunner;

    @RunWith(SpringRunner.class)
    @SpringBootTest
    public class UserMapperTest {
    @Autowired
    private UserMapper userMapper;
    @Test
    public void testSelectPage() {
    User user = this.userMapper.findById(2L);
    System.out.println(user);
    }
    }

typeAliasesPackage

MyBaits 别名包扫描路径,通过该属性可以给包中的类注册别名,注册后在 Mapper 对应的 XML 文件中可以直接使用类名,而不用使用全限定的类名(即 XML 中调用的时候不用包含包名)

  • SpringBoot

    1
    mybatis-plus.type-aliases-package = cn.itcast.mp.pojo
  • SpringMVC

    1
    2
    3
    4
    <bean id="sqlSessionFactory"
    class="com.baomidou.mybatisplus.extension.spring.MybatisSqlSessionFactoryBean">
    <property name="typeAliasesPackage" value="com.baomidou.mybatisplus.samples.quickstart.entity"/>
    </bean>

进阶配置

本部分(Confifiguration)的配置大都为 MyBatis 原生支持的配置,这意味着您可以通过 MyBatis XML 配置文件的形式进行配置。

mapUnderscoreToCamelCase

  • 类型:boolean
  • 默认值:true

是否开启自动驼峰命名规则(camel case)映射,即从经典数据库列名 A_COLUMN(下划线命名) 到经典 Java 属性名 aColumn(驼峰命名) 的类似映射。

  • 注意:

    此属性在 MyBatis 中原默认值为 false,在 MyBatis-Plus 中,此属性也将用于生成最终的 SQL 的 select body。

    如果您的数据库命名符合规则无需使用 @TableField 注解指定数据库字段名

  • SpringBoot

    1
    2
    #关闭自动驼峰映射,该参数不能和mybatis-plus.config-location同时存在
    mybatis-plus.configuration.map-underscore-to-camel-case=false

cacheEnabled

  • 类型:boolean
  • 默认值:true

全局地开启或关闭配置文件中的所有映射器已经配置的任何缓存,默认为 true。

  • 示例

    1
    mybatis-plus.configuration.cache-enabled=false

DB策略配置

idType

  • 类型:com.baomidou.mybatisplus.annotation.IdType
  • 默认值:ID_WORKER

全局默认主键类型,设置后,即可省略实体对象中的@Tableld(type=IdType.AUTO)配置

  • SpringBoot

    1
    mybatis-plus.global-config.db-config.id-type=auto
  • SpringMVC

    1
    2
    3
    4
    5
    6
    7
    8
    9
    10
    11
    12
    13
    14
    <!--这里使用MP提供的sqlSessionFactory,完成了Spring与MP的整合-->
    <bean id="sqlSessionFactory"
    class="com.baomidou.mybatisplus.extension.spring.MybatisSqlSessionFactoryBean">
    <property name="dataSource" ref="dataSource"/>
    <property name="globalConfig">
    <bean class="com.baomidou.mybatisplus.core.config.GlobalConfig">
    <property name="dbConfig">
    <bean class="com.baomidou.mybatisplus.core.config.GlobalConfig$DbConfig">
    <property name="idType" value="AUTO"/>
    </bean>
    </property>
    </bean>
    </property>
    </bean>

tablePrefix

  • 类型:String
  • 默认值:null

表名前缀,全局配置后可省略@TableName()配置

  • SpringBoot

    1
    mybatis-plus.global-config.db-config.table-prefix=tb_
  • SpringMVC

    1
    2
    3
    4
    5
    6
    7
    8
    9
    10
    11
    12
    13
    14
    <bean id="sqlSessionFactory"
    class="com.baomidou.mybatisplus.extension.spring.MybatisSqlSessionFactoryBean">
    <property name="dataSource" ref="dataSource"/>
    <property name="globalConfig">
    <bean class="com.baomidou.mybatisplus.core.config.GlobalConfig">
    <property name="dbConfig">
    <bean class="com.baomidou.mybatisplus.core.config.GlobalConfig$DbConfig">
    <property name="idType" value="AUTO"/>
    <property name="tablePrefix" value="tb_"/>
    </bean>
    </property>
    </bean>
    </property>
    </bean>

条件构造器

Wrapper接口的实现类关系如下

image-20230912152608902

可以看到,AbstractWrapper和AbstractChainWrapper是重点实现,接下来我们重点学习AbstractWrapper以及其子类。

说明

QueryWrapper(LambdaQueryWrapper) 和 UpdateWrapper(LambdaUpdateWrapper) 的父类 用于生成 sql

的 where 条件, entity 属性也用于生成 sql 的 where 条件 注意: entity 生成的 where 条件与 使用各个 api 生成

的 where 条件没有任何关联行为

allEq(全部eq(或个别isNull))

1
2
3
4
5
6
allEq(Map<R, V> params)
allEq(Map<R, V> params, boolean null2IsNull)
allEq(boolean condition, Map<R, V> params, boolean null2IsNull)
allEq(BiPredicate<R, V> filter, Map<R, V> params)
allEq(BiPredicate<R, V> filter, Map<R, V> params, boolean null2IsNull)
allEq(boolean condition, BiPredicate<R, V> filter, Map<R, V> params, boolean null2IsNull)

个别参数说明

  • params : key 为数据库字段名, value 为字段值
  • null2IsNull : 为 true 则在 map 的 value 为null 时调用 isNull 方法,为 false 时则忽略 value 为 null 的
  • filter:过滤函数,是否允许字段传入比对条件中params与null2IsNull
1
2
3
4
5
6
7
allEq({id:1,name:"老王",age:null}) ---> id = 1 and name = '老王' and age is null

allEq({id:1,name:"老王",age:null}, false) ---> id = 1 and name = '老王'

allEq((k,v) -> k.indexOf("a") > 0, {id:1,name:"老王",age:null}) ---> name = '老王' and age is null

allEq((k,v) -> k.indexOf("a") > 0, {id:1,name:"老王",age:null}, false) ---> name ='老王‘

测试用例

1
2
3
4
5
6
7
8
9
10
11
12
13
14
15
16
17
18
19
20
21
22
23
24
25
26
27
28
29
30
31
32
33
34
35
36
37
38
package cn.itcast.mp;
import cn.itcast.mp.mapper.UserMapper;
import cn.itcast.mp.pojo.User;
import com.baomidou.mybatisplus.core.conditions.query.QueryWrapper;
import org.junit.Test;
import org.junit.runner.RunWith;
import org.springframework.beans.factory.annotation.Autowired;
import org.springframework.boot.test.context.SpringBootTest;
import org.springframework.test.context.junit4.SpringRunner;
import java.util.HashMap;
import java.util.List;
import java.util.Map;

@RunWith(SpringRunner.class)
@SpringBootTest
public class UserMapperTest {

@Autowired
private UserMapper userMapper;

@Test
public void testWrapper() {
QueryWrapper<User> wrapper = new QueryWrapper<>();
//设置条件
Map<String,Object> params = new HashMap<>();
params.put("name", "曹操");
params.put("age", "20");
params.put("password", null);
//wrapper.allEq(params);//SELECT * FROM tb_user WHERE password IS NULL AND name = ? AND age = ?
// wrapper.allEq(params,false); //SELECT * FROM tb_user WHERE name = ? AND age = ?
// wrapper.allEq((k, v) -> (k.equals("name") || k.equals("age")),params);
//SELECT * FROM tb_user WHERE name = ? AND age = ?
List<User> users = this.userMapper.selectList(wrapper);
for (User user : users) {
System.out.println(user);
}
}
}

基本比较操作

  • eq(等于=)

  • ne(不等于<>)

  • gt(大于>)

  • ge(大于等于>=)

  • lt(小于<)

  • le(小于等于 <=)

  • between(between 值1 and 值2)

  • in(字段in (value.get(0) , value.get(1),…))

  • notIn(字段not in (v0 , v1 , ….))

测试用例

1
2
3
4
5
6
7
8
9
10
11
12
13
14
15
16
17
18
19
20
21
22
23
24
25
26
27
28
29
30
package cn.itcast.mp;
import cn.itcast.mp.mapper.UserMapper;
import cn.itcast.mp.pojo.User;
import com.baomidou.mybatisplus.core.conditions.query.QueryWrapper;
import org.junit.Test;
import org.junit.runner.RunWith;
import org.springframework.beans.factory.annotation.Autowired;
import org.springframework.boot.test.context.SpringBootTest;
import org.springframework.test.context.junit4.SpringRunner;
import java.util.List;

@RunWith(SpringRunner.class)
@SpringBootTest
public class UserMapperTest {

@Autowired
private UserMapper userMapper;
@Test
public void testEq() {
QueryWrapper<User> wrapper = new QueryWrapper<>();
//SELECT id,user_name,password,name,age,email FROM tb_user WHERE password = ?AND age >= ? AND name IN (?,?,?)
wrapper.eq("password", "123456")
.ge("age", 20)
.in("name", "李四", "王五", "赵六");
List<User> users = this.userMapper.selectList(wrapper);
for (User user : users) {
System.out.println(user);
}
}
}

模糊查询

like

  • like ‘%值%’
  • 例:like(“name”,”王”)—> name like ‘%王%’

notLike

  • NOT LIKE ‘%值%’

  • 例:notLike(“name”,”王”)—>name not like ‘%王%’

likeLeft

  • LIKE ‘%值%’
  • 例: likeLeft(“name”, “王”) —> name like ‘%王’

likeRight

  • LIKE ‘值%’
  • 例:likeRight(“name”, “王”) —> name like ‘王%’

测试用例

1
2
3
4
5
6
7
8
9
10
11
12
13
14
15
16
17
18
19
20
21
22
23
24
25
26
27
28
29
package cn.itcast.mp;
import cn.itcast.mp.mapper.UserMapper;
import cn.itcast.mp.pojo.User;
import com.baomidou.mybatisplus.core.conditions.query.QueryWrapper;
import org.junit.Test;
import org.junit.runner.RunWith;
import org.springframework.beans.factory.annotation.Autowired;
import org.springframework.boot.test.context.SpringBootTest;
import org.springframework.test.context.junit4.SpringRunner;
import java.util.List;

@RunWith(SpringRunner.class)
@SpringBootTest
public class UserMapperTest {

@Autowired
private UserMapper userMapper;
@Test
public void testWrapper() {
QueryWrapper<User> wrapper = new QueryWrapper<>();
//SELECT id,user_name,password,name,age,email FROM tb_user WHERE name LIKE ?
//Parameters: %曹%(String)
wrapper.like("name", "曹");
List<User> users = this.userMapper.selectList(wrapper);
for (User user : users) {
System.out.println(user);
}
}
}

排序

orderBy

  • 排序:ORDER BY 字段, …
  • 例: orderBy(true, true, “id”, “name”) —> order by id ASC,name ASC

orderByAsc

  • 排序:ORDER BY 字段, … ASC
  • 例:orderByAsc(“id”, “name”) —> order by id ASC,name ASC

orderByDesc

  • 排序:ORDER BY 字段, … DESC
  • 例: orderByDesc(“id”, “name”) —> order by id DESC,name DESC

测试用例

1
2
3
4
5
6
7
8
9
10
11
12
13
14
15
16
17
18
19
20
21
22
23
24
25
26
27
28
package cn.itcast.mp;
import cn.itcast.mp.mapper.UserMapper;
import cn.itcast.mp.pojo.User;
import com.baomidou.mybatisplus.core.conditions.query.QueryWrapper;
import org.junit.Test;
import org.junit.runner.RunWith;
import org.springframework.beans.factory.annotation.Autowired;
import org.springframework.boot.test.context.SpringBootTest;
import org.springframework.test.context.junit4.SpringRunner;
import java.util.List;

@RunWith(SpringRunner.class)
@SpringBootTest
public class UserMapperTest {

@Autowired
private UserMapper userMapper;
@Test
public void testWrapper() {
QueryWrapper<User> wrapper = new QueryWrapper<>();
//SELECT id,user_name,password,name,age,email FROM tb_user ORDER BY age DESC
wrapper.orderByDesc("age");
List<User> users = this.userMapper.selectList(wrapper);
for (User user : users) {
System.out.println(user);
}
}
}

逻辑查询

or

  • 拼接 OR
  • 主动调用 or 表示紧接着下一个方法不是用 and 连接!(不调用 or 则默认为使用 and 连接)

and

  • AND 嵌套
  • 例:and(i -> i.eq(“name”, “李白”).ne(“status”, “活着”)) —> and (name = ‘李白’ and status <> ‘活着’)

测试用例

1
2
3
4
5
6
7
8
9
10
11
12
13
14
15
16
17
18
19
20
21
22
23
24
25
26
27
28
29
package cn.itcast.mp;
import cn.itcast.mp.mapper.UserMapper;
import cn.itcast.mp.pojo.User;
import com.baomidou.mybatisplus.core.conditions.query.QueryWrapper;
import org.junit.Test;
import org.junit.runner.RunWith;
import org.springframework.beans.factory.annotation.Autowired;
import org.springframework.boot.test.context.SpringBootTest;
import org.springframework.test.context.junit4.SpringRunner;
import java.util.List;

@RunWith(SpringRunner.class)
@SpringBootTest
public class UserMapperTest {

@Autowired
private UserMapper userMapper;
@Test
public void testWrapper() {
QueryWrapper<User> wrapper = new QueryWrapper<>();
//SELECT id,user_name,password,name,age,email FROM tb_user WHERE name = ? OR
age = ?
wrapper.eq("name","李四").or().eq("age", 24);
List<User> users = this.userMapper.selectList(wrapper);
for (User user : users) {
System.out.println(user);
}
}
}

select

默认查询所有的字段,如果有需要也可以通过select方法进行指定字段。

1
2
3
4
5
6
7
8
9
10
11
12
13
14
15
16
17
18
19
20
21
22
23
24
25
26
27
28
29
30
31
package cn.itcast.mp;
import cn.itcast.mp.mapper.UserMapper;
import cn.itcast.mp.pojo.User;

import com.baomidou.mybatisplus.core.conditions.query.QueryWrapper;
import org.junit.Test;
import org.junit.runner.RunWith;
import org.springframework.beans.factory.annotation.Autowired;
import org.springframework.boot.test.context.SpringBootTest;
import org.springframework.test.context.junit4.SpringRunner;
import java.util.List;

@RunWith(SpringRunner.class)
@SpringBootTest
public class UserMapperTest {
@Autowired
private UserMapper userMapper;
@Test
public void testWrapper() {
QueryWrapper<User> wrapper = new QueryWrapper<>();
//SELECT id,name,age FROM tb_user WHERE name = ? OR age = ?
wrapper.eq("name", "李四")
.or()
.eq("age", 24)
.select("id", "name", "age");
List<User> users = this.userMapper.selectList(wrapper);
for (User user : users) {
System.out.println(user);
}
}
}

ActiveRecord

ActiveRecord(简称AR)一直广受动态语言( PHP 、 Ruby 等)的喜爱,而 Java 作为准静态语言,对于ActiveRecord 往往只能感叹其优雅,所以我们也在 AR 道路上进行了一定的探索

ActiveRecord也属于ORM(对象关系映射)层,由Rails最早提出,遵循标准的ORM模型:表映射到记录,记录映射到对象,字段映射到对象属性。配合遵循的命名和配置惯例,能够很大程度的快速实现模型的操作,而且简洁易懂。

ActiveRecord的主要思想是:

  • 每一个数据库表对应创建一个类,类的每一个对象实例对应于数据库中表的一行记录;通常表的每个字段在类中都有相应的Field;

  • ActiveRecord同时负责把自己持久化,在ActiveRecord中封装了对数据库的访问,即CURD;;

  • ActiveRecord是一种领域模型(Domain Model),封装了部分业务逻辑;

开启AR之旅

开启AR非常简单,只需要将实体对象继承Model即可

1
2
3
4
5
6
7
8
9
10
11
12
13
14
15
16
17
18
19
20
21
package cn.itcast.mp.pojo;
import com.baomidou.mybatisplus.annotation.IdType;
import com.baomidou.mybatisplus.annotation.TableField;
import com.baomidou.mybatisplus.annotation.TableId;
import com.baomidou.mybatisplus.annotation.TableName;
import com.baomidou.mybatisplus.extension.activerecord.Model;
import lombok.AllArgsConstructor;
import lombok.Data;
import lombok.NoArgsConstructor;

@Data
@NoArgsConstructor
@AllArgsConstructor
public class User extends Model<User> {
private Long id;
private String userName;
private String password;
private String name;
private Integer age;
private String email;
}

根据主键查询

1
2
3
4
5
6
7
8
9
10
11
12
13
14
15
@RunWith(SpringRunner.class)
@SpringBootTest
public class UserMapperTest {

@Autowired
private UserMapper userMapper;

@Test
public void testAR() {
User user = new User();
user.setId(2L);
User user2 = user.selectById();
System.out.println(user2);
}
}

新增数据

1
2
3
4
5
6
7
8
9
10
11
12
13
14
15
16
17
18
19
20
@RunWith(SpringRunner.class)
@SpringBootTest
public class UserMapperTest {

@Autowired
private UserMapper userMapper;

@Test
public void testAR() {
User user = new User();
user.setName("刘备");
user.setAge(30);
user.setPassword("123456");
user.setUserName("liubei");
user.setEmail("liubei@itcast.cn");
boolean insert = user.insert();
System.out.println(insert);
}
}

更新操作

1
2
3
4
5
6
7
8
9
10
11
12
13
14
15
@RunWith(SpringRunner.class)
@SpringBootTest
public class UserMapperTest {
@Autowired
private UserMapper userMapper;

@Test
public void testAR() {
User user = new User();
user.setId(8L);
user.setAge(35);
boolean update = user.updateById();
System.out.println(update);
}
}

删除操作

1
2
3
4
5
6
7
8
9
10
11
12
13
@RunWith(SpringRunner.class)
@SpringBootTest
public class UserMapperTest {
@Autowired
private UserMapper userMapper;
@Test
public void testAR() {
User user = new User();
user.setId(7L);
boolean delete = user.deleteById();
System.out.println(delete);
}
}

根据条件查询

1
2
3
4
5
6
7
8
9
10
11
12
13
14
15
16
@RunWith(SpringRunner.class)
@SpringBootTest
public class UserMapperTest {
@Autowired
private UserMapper userMapper;
@Test
public void testAR() {
User user = new User();
QueryWrapper<User> userQueryWrapper = new QueryWrapper<>();
userQueryWrapper.le("age","20");
List<User> users = user.selectList(userQueryWrapper);
for (User user1 : users) {
System.out.println(user1);
}
}
}

Oracle主键Sequence

在mysql中,主键往往是自增长的,这样使用起来是比较方便的,如果使用的是Oracle数据库,那么就不能使用自增长了,就得使用Sequence 序列生成id值了。

部署Oracle环境

为了简化环境部署,这里使用Docker环境进行部署安装Oracle。

1
2
3
4
5
6
7
8
9
10
11
12
13
14
15
16
17
18
19
20
21
22
23
24
25
26
27
28
29
30
31
32
33
34
35
36
37
38
39
40
41
42
43
#拉取镜像
docker pull sath89/oracle-12c
#创建容器
docker create --name oracle -p 1521:1521 sath89/oracle-12c
#启动
docker start oracle && docker logs -f oracle
#下面是启动过程
Database not initialized. Initializing database.
Starting tnslsnr
Copying database files
1% complete
3% complete
11% complete
18% complete
26% complete
37% complete
Creating and starting Oracle instance
40% complete
45% complete
50% complete
55% complete
56% complete
60% complete
62% complete
Completing Database Creation
66% complete
70% complete
73% complete
85% complete
96% complete
100% complete
Look at the log file "/u01/app/oracle/cfgtoollogs/dbca/xe/xe.log" for further details.
Configuring Apex console
Database initialized. Please visit http://#containeer:8080/em
http://#containeer:8080/apex for extra configuration if needed
Starting web management console
PL/SQL procedure successfully completed.
Starting import from '/docker-entrypoint-initdb.d':
ls: cannot access /docker-entrypoint-initdb.d/*: No such file or directory
Import finished
Database ready to use. Enjoy! ;)
#通过用户名密码即可登录
用户名和密码为: system/oracle

创建表以及序列

1
2
3
4
5
6
7
8
9
10
11
--创建表,表名以及字段名都要大写
CREATE TABLE "TB_USER" (
"ID" NUMBER(20) VISIBLE NOT NULL ,
"USER_NAME" VARCHAR2(255 BYTE) VISIBLE ,
"PASSWORD" VARCHAR2(255 BYTE) VISIBLE ,
"NAME" VARCHAR2(255 BYTE) VISIBLE ,
"AGE" NUMBER(10) VISIBLE ,
"EMAIL" VARCHAR2(255 BYTE) VISIBLE
)
--创建序列
CREATE SEQUENCE SEQ_USER START WITH 1 INCREMENT BY 1

jdbc驱动包

由于版权原因,我们不能直接通过maven的中央仓库下载oracle数据库的jdbc驱动包,所以我们需要将驱动包安装到本地仓库。

1
2
3
#ojdbc8.jar文件在资料中可以找到
mvn install:install-file -DgroupId=com.oracle -DartifactId=ojdbc8 -Dversion=12.1.0.1 -
Dpackaging=jar -Dfile=ojdbc8.jar

安装完成后的坐标

1
2
3
4
5
<dependency>
<groupId>com.oracle</groupId>
<artifactId>ojdbc8</artifactId>
<version>12.1.0.1</version>
</dependency>

修改application.properties

对于application.properties的修改,需要修改2个位置,分别是:

1
2
3
4
5
6
7
#数据库连接配置
spring.datasource.driver-class-name=oracle.jdbc.OracleDriver
spring.datasource.url=jdbc:oracle:thin:@192.168.31.81:1521:xe
spring.datasource.username=system
spring.datasource.password=oracle
#id生成策略
mybatis-plus.global-config.db-config.id-type=input

配置序列

使用Oracle的序列需要做2件事情:

  1. 需要配置MP的序列生成器到Spring容器

    1
    2
    3
    4
    5
    6
    7
    8
    9
    10
    11
    12
    13
    14
    15
    16
    17
    18
    19
    20
    21
    22
    23
    24
    25
    26
    package cn.itcast.mp;
    import com.baomidou.mybatisplus.extension.incrementer.OracleKeyGenerator;
    import com.baomidou.mybatisplus.extension.plugins.PaginationInterceptor;
    import org.mybatis.spring.annotation.MapperScan;
    import org.springframework.context.annotation.Bean;
    import org.springframework.context.annotation.Configuration;

    @Configuration
    @MapperScan("cn.itcast.mp.mapper") //设置mapper接口的扫描包
    public class MybatisPlusConfig {

    /**
    * 分页插件
    */
    @Bean
    public PaginationInterceptor paginationInterceptor() {
    return new PaginationInterceptor();
    }
    /**
    * 序列生成器
    */
    @Bean
    public OracleKeyGenerator oracleKeyGenerator(){
    return new OracleKeyGenerator();
    }
    }
  2. 在实体对象中指定序列的名称

    1
    2
    3
    4
    @KeySequence(value = "SEQ_USER", clazz =Long.class)
    public class User{
    ......
    }

测试

1
2
3
4
5
6
7
8
9
10
11
12
13
14
15
16
17
18
19
20
21
22
23
24
25
26
27
28
29
30
31
32
33
34
package cn.itcast.mp;
import cn.itcast.mp.mapper.UserMapper;
import cn.itcast.mp.pojo.User;
import org.junit.Test;
import org.junit.runner.RunWith;
import org.springframework.beans.factory.annotation.Autowired;
import org.springframework.boot.test.context.SpringBootTest;
import org.springframework.test.context.junit4.SpringRunner;
import java.util.List;
@RunWith(SpringRunner.class)
@SpringBootTest
public class UserMapperTest {
@Autowired
private UserMapper userMapper;

@Test
public void testInsert(){
User user = new User();
user.setAge(20);
user.setEmail("test@itcast.cn");
user.setName("曹操");
user.setUserName("caocao");
user.setPassword("123456");
int result = this.userMapper.insert(user); //返回的result是受影响的行数,并不是自增后的id
System.out.println("result = " + result);
System.out.println(user.getId()); //自增后的id会回填到对象中
}

@Test
public void testSelectById(){
User user = this.userMapper.selectById(8L);
System.out.println(user);
}
}

插件

mybatis的插件机制

MyBatis 允许你在已映射语句执行过程中的某一点进行拦截调用。默认情况下,MyBatis 允许使用插件来拦截的方法

调用包括:

1
2
3
4
1. Executor (update, query, flushStatements, commit, rollback, getTransaction, close, isClosed)
2. ParameterHandler (getParameterObject, setParameters)
3. ResultSetHandler (handleResultSets, handleOutputParameters)
4. StatementHandler (prepare, parameterize, batch, update, query)

我们看到了可以拦截Executor接口的部分方法,比如update,query,commit,rollback等方法,还有其他接口的一些方法等.

总体概括为:

  1. 拦截执行器的方法
  2. 拦截参数的处理
  3. 拦截结果集的处理
  4. 拦截sql语法构建的处理

拦截器示例

1
2
3
4
5
6
7
8
9
10
11
12
13
14
15
16
17
18
19
20
21
22
package cn.itcast.mp.plugins;
import org.apache.ibatis.executor.Executor;
import org.apache.ibatis.mapping.MappedStatement;
import org.apache.ibatis.plugin.*;
import java.util.Properties;
@Intercepts({@Signature(type= Executor.class,method = "update",args = {MappedStatement.class,Object.class})})
public class MyInterceptor implements Interceptor {
@Override
public Object intercept(Invocation invocation) throws Throwable {
//拦截方法,具体业务逻辑编写的位置
return invocation.proceed();
}
@Override
public Object plugin(Object target) {
//创建target对象的代理对象,目的是将当前拦截器加入到该对象中
return Plugin.wrap(target, this);
}
@Override
public void setProperties(Properties properties) {
//属性设置
}
}
注入到Spring容器
1
2
3
4
5
6
7
/**
* 自定义拦截器
*/
@Bean
public MyInterceptor myInterceptor(){
return new MyInterceptor();
}
或者通过xml配置,mybatis-config.xml
1
2
3
4
5
6
7
8
9
<?xml version="1.0" encoding="UTF-8" ?>
<!DOCTYPE configuration
PUBLIC "-//mybatis.org//DTD Config 3.0//EN"
"http://mybatis.org/dtd/mybatis-3-config.dtd">
<configuration>
<plugins>
<plugin interceptor="cn.itcast.mp.plugins.MyInterceptor"></plugin>
</plugins>
</configuration>

执行分析插件

在MP中提供了对SQL执行的分析的插件,可用作阻断全表更新、删除的操作,注意:该插件仅适用于开发环境,不适用于生产环境

springboot配置

1
2
3
4
5
6
7
8
9
@Bean
public SqlExplainInterceptor sqlExplainInterceptor(){
SqlExplainInterceptor sqlExplainInterceptor = new SqlExplainInterceptor();
List<ISqlParser> sqlParserList = new ArrayList<>();
// 攻击 SQL 阻断解析器、加入解析链
sqlParserList.add(new BlockAttackSqlParser());
sqlExplainInterceptor.setSqlParserList(sqlParserList);
return sqlExplainInterceptor;
}

测试

1
2
3
4
5
6
7
@Test
public void testUpdate(){
User user = new User();
user.setAge(20);
int result = this.userMapper.update(user, null);
System.out.println("result = " + result);
}

可以看到,当执行全表更新时,会抛出异常,这样有效防止了一些误操作.

性能分析插件

性能分析拦截器,用于输出每条 SQL 语句及其执行时间,可以设置最大执行时间,超过时间会抛出异常。(该插件只用于开发环境,不建议生产环境使用。)

配置

1
2
3
4
5
6
7
8
9
10
11
12
13
14
15
<?xml version="1.0" encoding="UTF-8" ?>
<!DOCTYPE configuration
PUBLIC "-//mybatis.org//DTD Config 3.0//EN"
"http://mybatis.org/dtd/mybatis-3-config.dtd">
<configuration>
<plugins>
<!-- SQL 执行性能分析,开发环境使用,线上不推荐。 maxTime 指的是 sql 最大执行时长 -->
<plugin
interceptor="com.baomidou.mybatisplus.extension.plugins.PerformanceInterceptor">
<property name="maxTime" value="100" />
<!--SQL是否格式化 默认false-->
<property name="format" value="true" />
</plugin>
</plugins>
</configuration>

执行结果:

1
2
3
4
5
6
7
8
9
10
11
12
13
Time:11 ms - ID cn.itcast.mp.mapper.UserMapper.selectById
Execute SQL:
SELECT
id,
user_name,
password,
name,
age,
email
FROM
tb_user
WHERE
id=7

可以看到,执行时间为11ms。如果将maxTime设置为1,那么,该操作会抛出异常

乐观锁插件

主要适用场景

意图

当要更新一条记录的时候,希望这条记录没有被别人更新

乐观锁实现方式
  • 取出记录时,获取当前version

  • 更新时,带上这个version

  • 执行更新时, set version = newVersion where version = oldVersion,如果version不对,就更新失败

插件配置

  • spring.xml

    1
    <bean class="com.baomidou.mybatisplus.extension.plugins.OptimisticLockerInterceptor"/>
  • springBoot

    1
    2
    3
    4
    @Bean
    public OptimisticLockerInterceptor optimisticLockerInterceptor() {
    return new OptimisticLockerInterceptor();
    }

注解实体字段

需要为实体字段添加@Version注解。

  1. 为表添加version字段,并且设置初始值为1

    1
    2
    3
    ALTER TABLE `tb_user`
    ADD COLUMN `version` int(10) NULL AFTER `email`;
    UPDATE `tb_user` SET `version`='1';
  2. 为User实体对象添加version字段,并且添加@Version注解

    1
    2
    @Version
    private Integer version;

测试

1
2
3
4
5
6
7
8
9
@Test
public void testUpdate(){
User user = new User();
user.setAge(30);
user.setId(2L);
user.setVersion(1); //获取到version为1
int result = this.userMapper.updateById(user);
System.out.println("result = " + result);
}

可以看到,更新的条件中有version条件,并且更新的version为2。

如果再次执行,更新则不成功。这样就避免了多人同时更新时导致数据的不一致

特别说明

  1. 支持的数据类型只有:int,Integer,long,Long,Date,Timestamp,LocalDateTime

  2. 整数类型下 newVersion = oldVersion + 1

  3. newVersion 会回写到 entity 中

  4. 仅支持 updateById(id) 与 update(entity, wrapper) 方法

  5. 在update(entity, wrapper)方法下, wrapper不能复用!!!

Sql注入器

我们已经知道,在MP中,通过AbstractSqlInjector将BaseMapper中的方法注入到了Mybatis容器,这样这些方法才可以正常执行。那么,如果我们需要扩充BaseMapper中的方法,又该如何实现呢?

编写MyBaseMapper

1
2
3
4
5
6
package cn.itcast.mp.mapper;
import com.baomidou.mybatisplus.core.mapper.BaseMapper;
import java.util.List;
public interface MyBaseMapper<T> extends BaseMapper<T> {
List<T> findAll();
}

其他的Mapper都可以继承该Mapper,这样实现了统一的扩展

1
2
3
4
5
package cn.itcast.mp.mapper;
import cn.itcast.mp.pojo.User;
public interface UserMapper extends MyBaseMapper<User> {
User findById(Long id);
}

编写MySqlInjector

如果直接继承AbstractSqlInjector的话,原有的BaseMapper中的方法将失效,所以我们选择继承DefaultSqlInjector进行扩展。

1
2
3
4
5
6
7
8
9
10
11
12
13
14
15
package cn.itcast.mp.sqlInjector;
import com.baomidou.mybatisplus.core.injector.AbstractMethod;
import com.baomidou.mybatisplus.core.injector.DefaultSqlInjector;
import java.util.List;
public class MySqlInjector extends DefaultSqlInjector {

@Override
public List<AbstractMethod> getMethodList() {
List<AbstractMethod> methodList = super.getMethodList();
methodList.add(new FindAll());
// 再扩充自定义的方法
list.add(new FindAll());
return methodList;
}
}

编写FindAll

1
2
3
4
5
6
7
8
9
10
11
12
13
14
15
16
package cn.itcast.mp.sqlInjector;
import com.baomidou.mybatisplus.core.enums.SqlMethod;
import com.baomidou.mybatisplus.core.injector.AbstractMethod;
import com.baomidou.mybatisplus.core.metadata.TableInfo;
import org.apache.ibatis.mapping.MappedStatement;
import org.apache.ibatis.mapping.SqlSource;
public class FindAll extends AbstractMethod {

@Override
public MappedStatement injectMappedStatement(Class<?> mapperClass, Class<?> modelClass, TableInfo tableInfo) {
String sqlMethod = "findAll";
String sql = "select * from " + tableInfo.getTableName();
SqlSource sqlSource = languageDriver.createSqlSource(configuration, sql, modelClass);
return this.addSelectMappedStatement(mapperClass, sqlMethod, sqlSource,modelClass, tableInfo);
}
}

注册到Spring容器

1
2
3
4
5
6
7
/**
* 自定义SQL注入器
*/
@Bean
public MySqlInjector mySqlInjector(){
return new MySqlInjector();
}

测试

1
2
3
4
5
6
7
@Test
public void testFindAll(){
List<User> users = this.userMapper.findAll();
for (User user : users) {
System.out.println(user);
}
}

输出的sql:

1
2
3
[main] [cn.itcast.mp.mapper.UserMapper.findAll]-[DEBUG] ==> Preparing: select * from tb_user
[main] [cn.itcast.mp.mapper.UserMapper.findAll]-[DEBUG] ==> Parameters:
[main] [cn.itcast.mp.mapper.UserMapper.findAll]-[DEBUG] <== Total: 10

至此,我们实现了全局扩展SQL注入器。

自动填充功能

有些时候我们可能会有这样的需求,插入或者更新数据时,希望有些字段可以自动填充数据,比如密码、version等。在MP中提供了这样的功能,可以实现自动填充。

添加@TableField注解

1
2
@TableField(fill = FieldFill.INSERT) //插入数据时进行填充
private String password;

为password添加自动填充功能,在新增数据时有效。

FieldFill提供了多种模式选择

1
2
3
4
5
6
7
8
9
10
11
12
13
14
15
16
17
18
public enum FieldFill {
/**
* 默认不处理
*/
DEFAULT,
/**
* 插入时填充字段
*/
INSERT,
/**
* 更新时填充字段
*/
UPDATE,
/**
* 插入和更新时填充字段
*/
INSERT_UPDATE
}

编写MyMetaObjectHandler

1
2
3
4
5
6
7
8
9
10
11
12
13
14
15
16
17
18
19
package cn.itcast.mp.handler;
import com.baomidou.mybatisplus.core.handlers.MetaObjectHandler;
import org.apache.ibatis.reflection.MetaObject;
import org.springframework.stereotype.Component;

@Component
public class MyMetaObjectHandler implements MetaObjectHandler {
@Override
public void insertFill(MetaObject metaObject) {
Object password = getFieldValByName("password", metaObject);
if(null == password){
//字段为空,可以进行填充
setFieldValByName("password", "123456", metaObject);
}
}
@Override
public void updateFill(MetaObject metaObject) {
}
}

测试

1
2
3
4
5
6
7
8
9
10
11
@Test
public void testInsert(){
User user = new User();
user.setName("关羽");
user.setUserName("guanyu");
user.setAge(30);
user.setEmail("guanyu@itast.cn");
user.setVersion(1);
int result = this.userMapper.insert(user);
System.out.println("result = " + result);
}

逻辑删除

开发系统时,有时候在实现功能时,删除操作需要实现逻辑删除,所谓逻辑删除就是将数据标记为删除,而并非真正的物理删除(非DELETE操作),查询时需要携带状态条件,确保被标记的数据不被查询到。这样做的目的就是避免数据被真正的删除。

修改表结构

为tb_user表增加deleted字段,用于表示数据是否被删除,1代表删除,0代表未删除。

1
2
ALTER TABLE `tb_user`
ADD COLUMN `deleted` int(1) NULL DEFAULT 0 COMMENT '1代表删除,0代表未删除' AFTER `version`;

同时,也修改User实体,增加deleted属性并且添加@TableLogic注解:

1
2
@TableLogic
private Integer deleted;

配置

application.properties:

1
2
3
4
# 逻辑已删除值(默认为 1)
mybatis-plus.global-config.db-config.logic-delete-value=1
# 逻辑未删除值(默认为 0)
mybatis-plus.global-config.db-config.logic-not-delete-value=0

测试

1
2
3
4
@Test
public void testDeleteById(){
this.userMapper.deleteById(2L);
}

执行的SQL

1
2
3
[main] [cn.itcast.mp.mapper.UserMapper.deleteById]-[DEBUG] ==> Preparing: UPDATE tb_user SET deleted=1 WHERE id=? AND deleted=0
[main] [cn.itcast.mp.mapper.UserMapper.deleteById]-[DEBUG] ==> Parameters: 2(Long)
[main] [cn.itcast.mp.mapper.UserMapper.deleteById]-[DEBUG] <== Updates: 1

测试查询

1
2
3
4
5
@Test
public void testSelectById(){
User user = this.userMapper.selectById(2L);
System.out.println(user);
}

执行的SQL

1
2
3
4
5
[main] [cn.itcast.mp.mapper.UserMapper.selectById]-[DEBUG] ==> Preparing: SELECT
id,user_name,password,name,age,email,version,deleted FROM tb_user WHERE id=? AND
deleted=0
[main] [cn.itcast.mp.mapper.UserMapper.selectById]-[DEBUG] ==> Parameters: 2(Long)
[main] [cn.itcast.mp.mapper.UserMapper.selectById]-[DEBUG] <== Total: 0

通用枚举

解决了繁琐的配置,让 mybatis 优雅的使用枚举属性

修改表结构

1
2
ALTER TABLE `tb_user`
ADD COLUMN `sex` int(1) NULL DEFAULT 1 COMMENT '1-男,2-女' AFTER `deleted`;

定义枚举

1
2
3
4
5
6
7
8
9
10
11
12
13
14
15
16
17
18
19
20
21
22
23
package cn.itcast.mp.enums;
import com.baomidou.mybatisplus.core.enums.IEnum;
import com.fasterxml.jackson.annotation.JsonValue;
public enum SexEnum implements IEnum<Integer> {

MAN(1,"男"),
WOMAN(2,"女");
private int value;
private String desc;

SexEnum(int value, String desc) {
this.value = value;
this.desc = desc;
}
@Override
public Integer getValue() {
return this.value;
}
@Override
public String toString() {
return this.desc;
}
}

配置

1
2
# 枚举包扫描
mybatis-plus.type-enums-package=cn.itcast.mp.enums

修改实体

1
private SexEnum sex;

测试

插入测试

1
2
3
4
5
6
7
8
9
10
11
12
@Test
public void testInsert(){
User user = new User();
user.setName("貂蝉");
user.setUserName("diaochan");
user.setAge(20);
user.setEmail("diaochan@itast.cn");
user.setVersion(1);
user.setSex(SexEnum.WOMAN);
int result = this.userMapper.insert(user);
System.out.println("result = " + result);
}
1
2
3
4
5
6
7
[main] [cn.itcast.mp.mapper.UserMapper.insert]-[DEBUG] ==> Preparing: INSERT INTO
tb_user ( user_name, password, name, age, email, version, sex ) VALUES ( ?, ?, ?, ?, ?,
?, ? )
[main] [cn.itcast.mp.mapper.UserMapper.insert]-[DEBUG] ==> Parameters:
diaochan(String), 123456(String), 貂蝉(String), 20(Integer), diaochan@itast.cn(String),
1(Integer), 2(Integer)
[main] [cn.itcast.mp.mapper.UserMapper.insert]-[DEBUG] <== Updates: 1

查询

1
2
3
4
5
@Test
public void testSelectById(){
User user = this.userMapper.selectById(2L);
System.out.println(user);
}

结果

1
2
3
4
5
6
7
[main] [cn.itcast.mp.mapper.UserMapper.selectById]-[DEBUG] ==> Preparing: SELECT
id,user_name,password,name,age,email,version,deleted,sex FROM tb_user WHERE id=? AND
deleted=0
[main] [cn.itcast.mp.mapper.UserMapper.selectById]-[DEBUG] ==> Parameters: 2(Long)
[main] [cn.itcast.mp.mapper.UserMapper.selectById]-[DEBUG] <== Total: 1
User(id=2, userName=lisi, password=123456, name=李四, age=30, email=test2@itcast.cn,
address=null, version=2, deleted=0, sex=女)

从测试可以看出,可以很方便的使用枚举了。

查询条件

1
2
3
4
5
6
7
8
9
@Test
public void testSelectBySex() {
QueryWrapper<User> wrapper = new QueryWrapper<>();
wrapper.eq("sex", SexEnum.WOMAN);
List<User> users = this.userMapper.selectList(wrapper);
for (User user : users) {
System.out.println(user);
}
}
1
2
3
4
5
[main] [cn.itcast.mp.mapper.UserMapper.selectList]-[DEBUG] ==> Preparing: SELECT
id,user_name,password,name,age,email,version,deleted,sex FROM tb_user WHERE deleted=0
AND sex = ?
[main] [cn.itcast.mp.mapper.UserMapper.selectList]-[DEBUG] ==> Parameters: 2(Integer)
[main] [cn.itcast.mp.mapper.UserMapper.selectList]-[DEBUG] <== Total: 3

代码生成器

AutoGenerator 是 MyBatis-Plus 的代码生成器,通过 AutoGenerator 可以快速生成 Entity、Mapper、MapperXML、Service、Controller 等各个模块的代码,极大的提升了开发效率。

创建工程

pom文件

1
2
3
4
5
6
7
8
9
10
11
12
13
14
15
16
17
18
19
20
21
22
23
24
25
26
27
28
29
30
31
32
33
34
35
36
37
38
39
40
41
42
43
44
45
46
47
48
49
50
51
52
53
54
55
56
57
<?xml version="1.0" encoding="UTF-8"?>
<project xmlns="http://maven.apache.org/POM/4.0.0"
xmlns:xsi="http://www.w3.org/2001/XMLSchema-instance"
xsi:schemaLocation="http://maven.apache.org/POM/4.0.0
http://maven.apache.org/xsd/maven-4.0.0.xsd">
<modelVersion>4.0.0</modelVersion>

<parent>
<groupId>org.springframework.boot</groupId>
<artifactId>spring-boot-starter-parent</artifactId>
<version>2.1.4.RELEASE</version>
</parent>

<groupId>cn.itcast.mp</groupId>
<artifactId>itcast-mp-generator</artifactId>
<version>1.0-SNAPSHOT</version>
<dependencies>
<dependency>
<groupId>org.springframework.boot</groupId>
<artifactId>spring-boot-starter-test</artifactId>
<scope>test</scope>
</dependency>
<!--mybatis-plus的springboot支持-->
<dependency>
<groupId>com.baomidou</groupId>
<artifactId>mybatis-plus-boot-starter</artifactId>
<version>3.1.1</version>
</dependency>
<dependency>
<groupId>com.baomidou</groupId>
<artifactId>mybatis-plus-generator</artifactId>
<version>3.1.1</version>
</dependency>
<dependency>
<groupId>org.springframework.boot</groupId>
<artifactId>spring-boot-starter-freemarker</artifactId>
</dependency>
<!--mysql驱动-->
<dependency>
<groupId>mysql</groupId>
<artifactId>mysql-connector-java</artifactId>
<version>5.1.47</version>
</dependency>
<dependency>
<groupId>org.slf4j</groupId>
<artifactId>slf4j-log4j12</artifactId>
</dependency>
</dependencies>
<build>
<plugins>
<plugin>
<groupId>org.springframework.boot</groupId>
<artifactId>spring-boot-maven-plugin</artifactId>
</plugin>
</plugins>
</build>
</project>

代码

1
2
3
4
5
6
7
8
9
10
11
12
13
14
15
16
17
18
19
20
21
22
23
24
25
26
27
28
29
30
31
32
33
34
35
36
37
38
39
40
41
42
43
44
45
46
47
48
49
50
51
52
53
54
55
56
57
58
59
60
61
62
63
64
65
66
67
68
69
70
71
72
73
74
75
76
77
78
79
80
81
82
83
84
85
86
87
88
89
90
91
92
93
94
95
96
97
98
99
100
101
102
103
104
105
package cn.itcast.mp.generator;
import java.util.ArrayList;
import java.util.List;
import java.util.Scanner;
import com.baomidou.mybatisplus.core.exceptions.MybatisPlusException;
import com.baomidou.mybatisplus.core.toolkit.StringPool;
import com.baomidou.mybatisplus.core.toolkit.StringUtils;
import com.baomidou.mybatisplus.generator.AutoGenerator;
import com.baomidou.mybatisplus.generator.InjectionConfig;
import com.baomidou.mybatisplus.generator.config.DataSourceConfig;
import com.baomidou.mybatisplus.generator.config.FileOutConfig;
import com.baomidou.mybatisplus.generator.config.GlobalConfig;
import com.baomidou.mybatisplus.generator.config.PackageConfig;
import com.baomidou.mybatisplus.generator.config.StrategyConfig;
import com.baomidou.mybatisplus.generator.config.TemplateConfig;
import com.baomidou.mybatisplus.generator.config.po.TableInfo;
import com.baomidou.mybatisplus.generator.config.rules.NamingStrategy;
import com.baomidou.mybatisplus.generator.engine.FreemarkerTemplateEngine;
/**
* <p>
* mysql 代码生成器演示例子
* </p>
*/
public class MysqlGenerator {
/**
* <p>
* 读取控制台内容
* </p>
*/
public static String scanner(String tip) {
Scanner scanner = new Scanner(System.in);
StringBuilder help = new StringBuilder();
help.append("请输入" + tip + ":");
System.out.println(help.toString());
if (scanner.hasNext()) {
String ipt = scanner.next();
if (StringUtils.isNotEmpty(ipt)) {
return ipt;
}
}
throw new MybatisPlusException("请输入正确的" + tip + "!");
}

/**
* RUN THIS
*/
public static void main(String[] args) {
// 代码生成器
AutoGenerator mpg = new AutoGenerator();
// 全局配置
GlobalConfig gc = new GlobalConfig();
String projectPath = System.getProperty("user.dir");
gc.setOutputDir(projectPath + "/src/main/java");
gc.setAuthor("itcast");
gc.setOpen(false);
mpg.setGlobalConfig(gc);
// 数据源配置
DataSourceConfig dsc = new DataSourceConfig();
dsc.setUrl("jdbc:mysql://127.0.0.1:3306/mp?
useUnicode=true&useSSL=false&characterEncoding=utf8");
// dsc.setSchemaName("public");
dsc.setDriverName("com.mysql.jdbc.Driver");
dsc.setUsername("root");
dsc.setPassword("root");
mpg.setDataSource(dsc);
// 包配置
PackageConfig pc = new PackageConfig();
pc.setModuleName(scanner("模块名"));
pc.setParent("cn.itcast.mp.generator");
mpg.setPackageInfo(pc);
// 自定义配置
InjectionConfig cfg = new InjectionConfig() {
@Override
public void initMap() {
// to do nothing
}
};
List<FileOutConfig> focList = new ArrayList<>();
focList.add(new FileOutConfig("/templates/mapper.xml.ftl") {
@Override
public String outputFile(TableInfo tableInfo) {
// 自定义输入文件名称
return projectPath + "/itcast-mpgenerator/src/main/resources/mapper/" + pc.getModuleName()+ "/" + tableInfo.getEntityName() + "Mapper" + StringPool.DOT_XML;
}
});
cfg.setFileOutConfigList(focList);
mpg.setCfg(cfg);
mpg.setTemplate(new TemplateConfig().setXml(null));
// 策略配置
StrategyConfig strategy = new StrategyConfig();
strategy.setNaming(NamingStrategy.underline_to_camel);
strategy.setColumnNaming(NamingStrategy.underline_to_camel);
//strategy.setSuperEntityClass("com.baomidou.mybatisplus.samples.generator.common.BaseEntity");
strategy.setEntityLombokModel(true);
//strategy.setSuperControllerClass("com.baomidou.mybatisplus.samples.generator.common.BaseController");
strategy.setInclude(scanner("表名"));
strategy.setSuperEntityColumns("id");
strategy.setControllerMappingHyphenStyle(true);
strategy.setTablePrefix(pc.getModuleName() + "_");
mpg.setStrategy(strategy);
// 选择 freemarker 引擎需要指定如下加,注意 pom 依赖必须有!
mpg.setTemplateEngine(new FreemarkerTemplateEngine());
mpg.execute();
}
}

MybatisX快速开发插件

MybatisX 是一款基于 IDEA 的快速开发插件,为效率而生。

安装方法:打开 IDEA,进入 File -> Settings -> Plugins -> Browse Repositories,输入 mybatisx 搜索并安装。

功能:

  • Java 与 XML 调回跳转

  • Mapper 方法自动生成 XML


Mybatis-Plus
http://example.com/2023/09/17/MybatisPlus/mybatisPlus/
作者
zhuixun
发布于
2023年9月17日
许可协议